Sort by Category
- October 2025
- September 2025
- August 2025
- June 2025
- August 2024
- July 2024
- June 2024
- May 2024
- February 2024
- January 2024
- December 2023
- November 2023
- October 2023
- September 2023
- August 2023
- July 2023
- March 2023
- February 2023
- January 2023
- December 2022
- November 2022
- October 2022
- September 2022
- August 2022
- June 2022
- May 2022
- April 2022
- March 2022
- February 2022
- January 2022
- December 2021
- November 2021
- October 2021
- September 2021
- August 2021
- July 2021
- June 2021
- May 2021
- April 2021
- March 2021
- February 2021
- January 2021
- December 2020
- November 2020
- October 2020
- September 2020
- August 2020
- July 2020
- June 2020
- May 2020
- April 2020
- March 2020
- February 2020
- January 2020
- December 2019
- November 2019
- October 2019
- September 2019
- August 2019
- July 2019
- June 2019
- May 2019
- April 2019
- March 2019
- February 2019
- January 2019
- December 2018
- November 2018
- October 2018
- September 2018
- August 2018
- July 2018
- June 2018
- May 2018
- April 2018
- March 2018
- February 2018

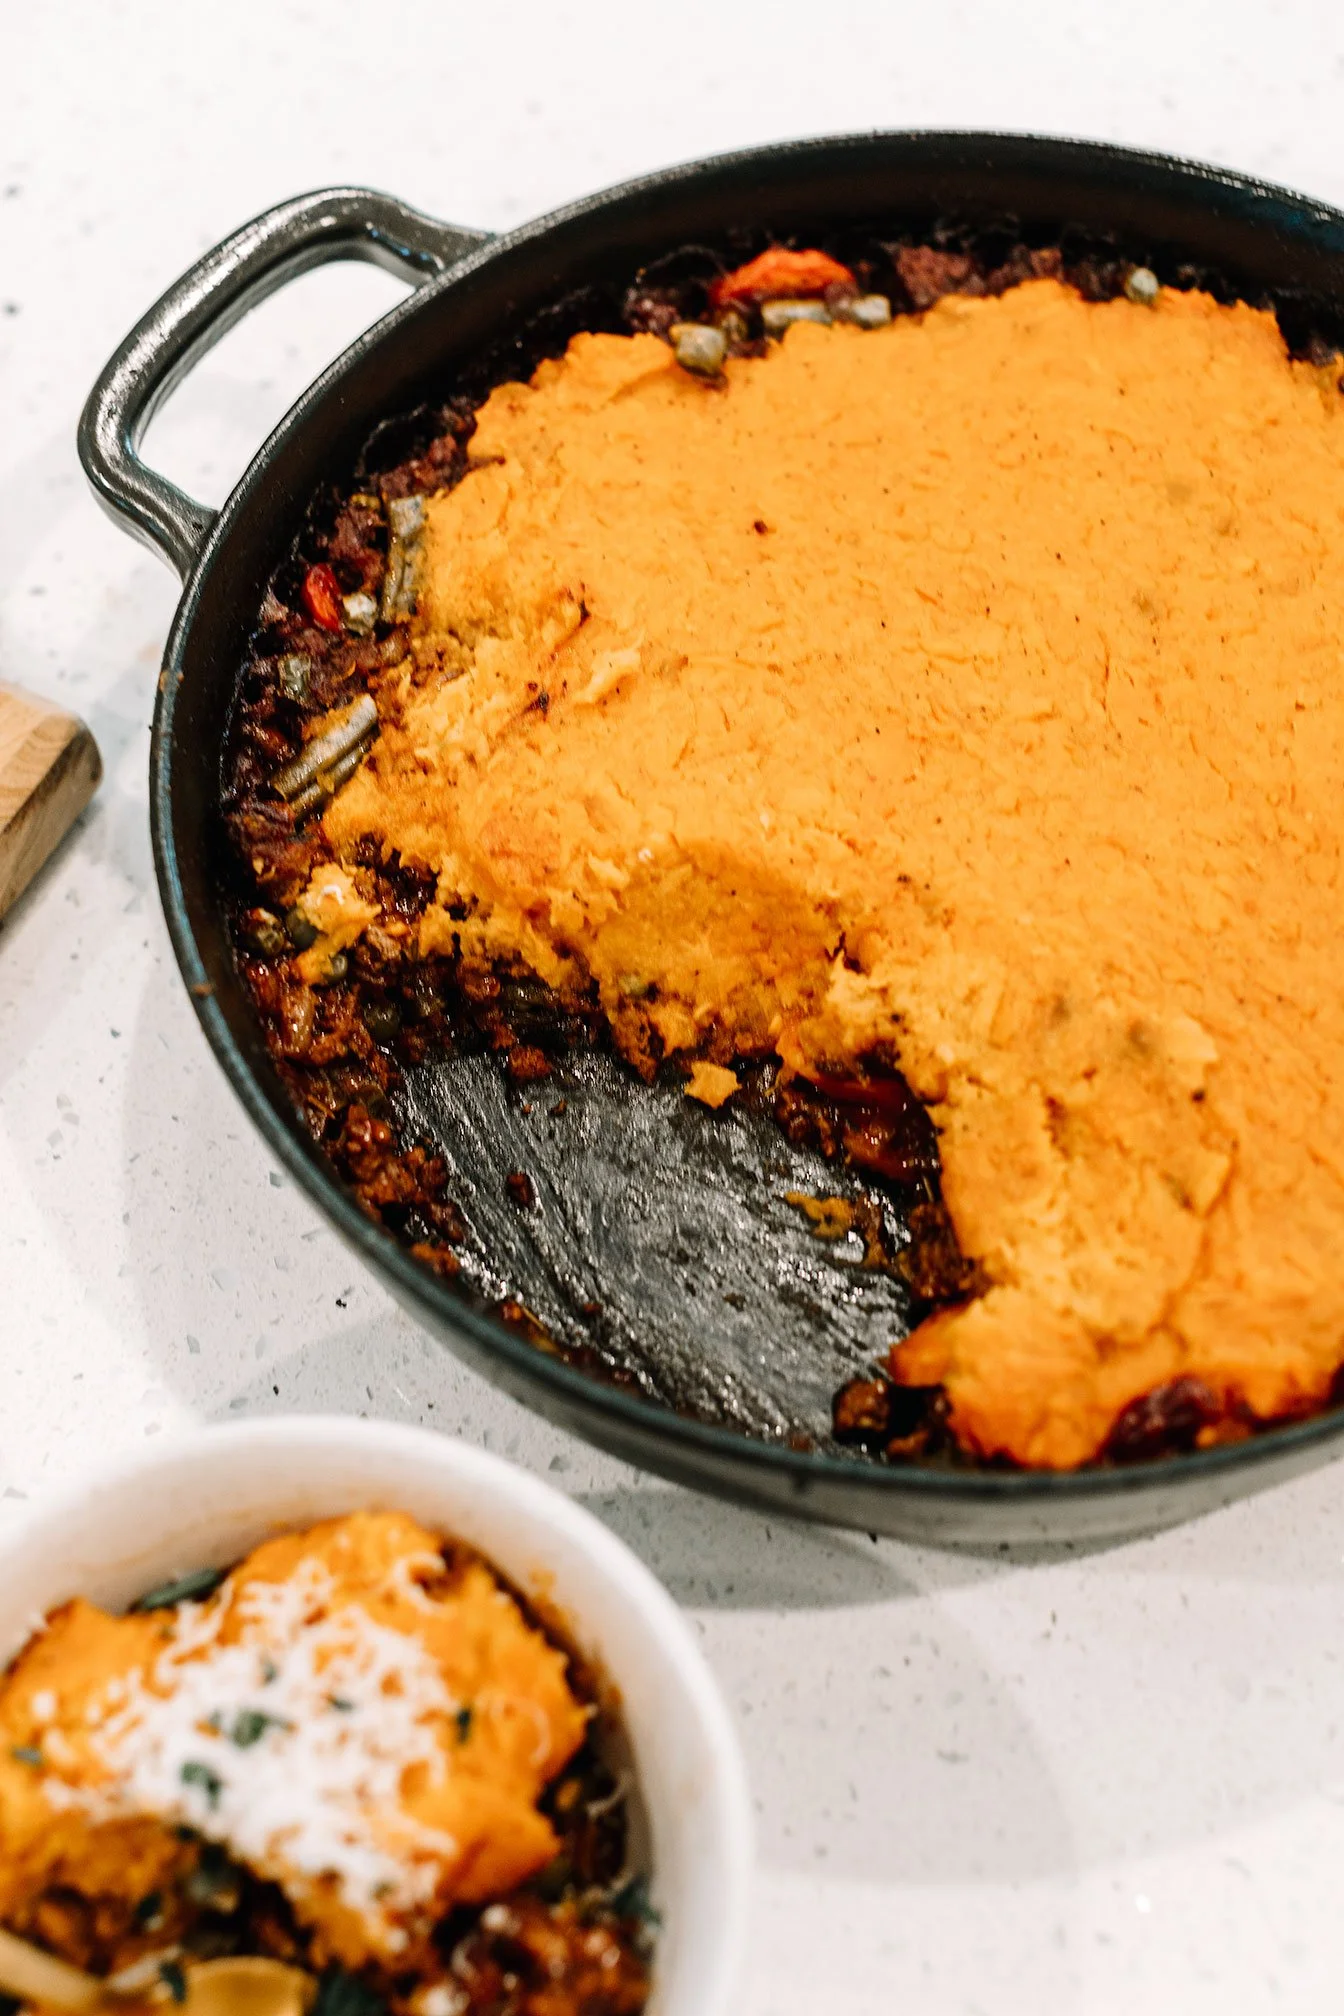
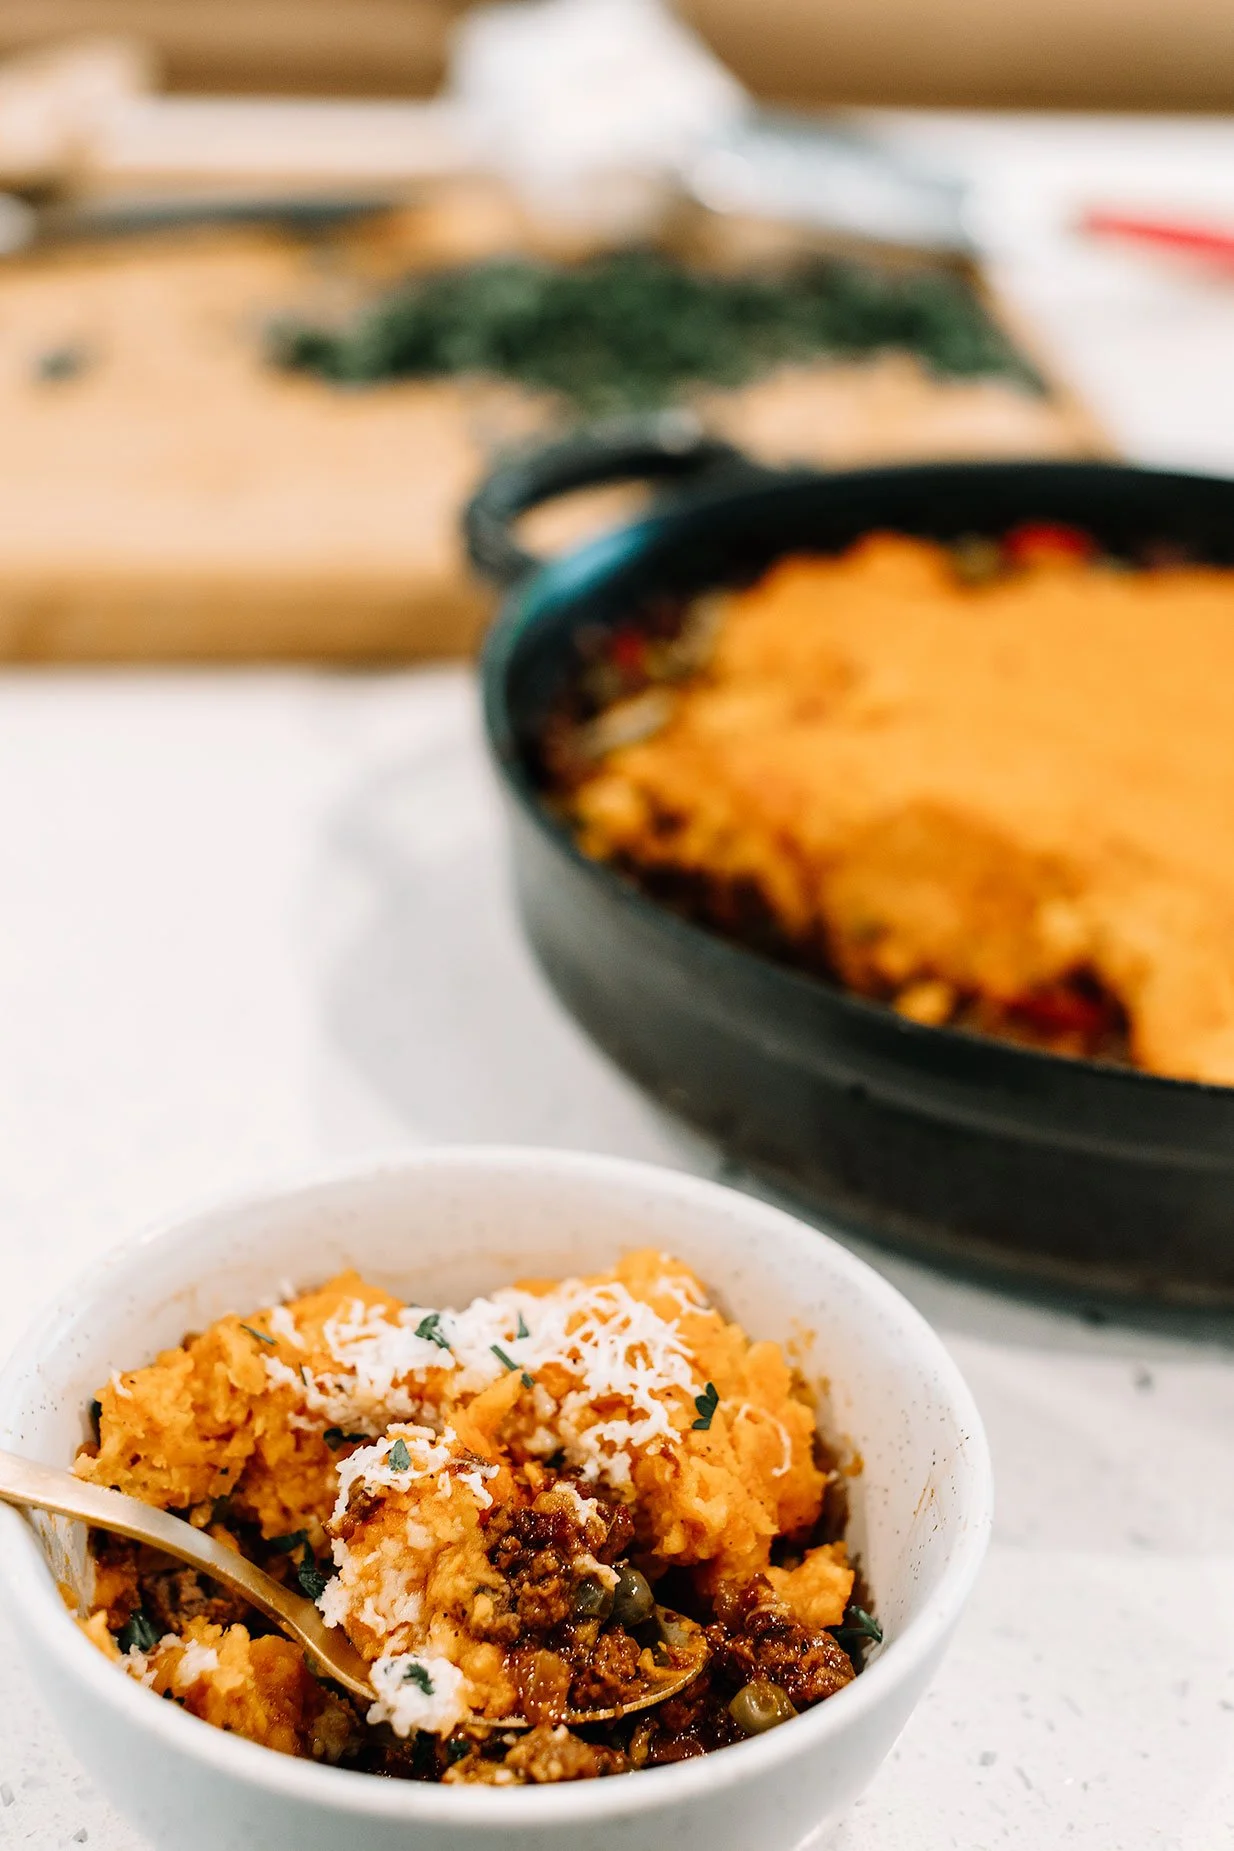
Healthy Sweet Potato Shepherd’s Pie (Technically Cottage Pie!)
This healthy sweet potato shepherd’s pie is gluten-free & dairy-free friendly! A cozy hormone-supporting meal, perfect for cycle syncing or family dinners.
This healthy shepherd’s pie (technically cottage pie!) uses ground beef, veggies, and a creamy sweet potato topping. Gluten-free & dairy-free friendly comfort food.

If you’re craving a warm, comforting meal that’s both nutrient-dense and family-approved, this Sweet Potato Shepherd’s Pie with ground beef and veggies is about to become a staple. It’s like shepherd’s pie meets a cozy fall casserole — but with a mineral-rich twist that supports hormone balance and energy.
This recipe is gluten-free and dairy-free friendly, making it perfect for anyone looking for a hearty, nourishing dinner without the heaviness of traditional casseroles.
💡 A quick note on naming: Traditionally, shepherd’s pie is made with lamb, while the beef version is technically called cottage pie. Since most people are more familiar with the term shepherd’s pie when it comes to beef, I’ve used that name here for easier recognition. But yes — if we’re being precise, this recipe is a cozy cottage pie with sweet potato topping.
🎥 Watch the Recipe in Action
I put together a quick reel walking you through this recipe step-by-step! Full disclosure: I filmed this during my period (hello, real life 👋), but that’s actually what makes this dish even more special — it’s loaded with nutrients that support your body during the menstrual phase.
Why This Recipe is Great for Your Menstrual Phase
If you’re into cycle syncing, you’ll love this:
Sweet potatoes are rich in slow-digesting carbs and vitamin A, which can help support stable energy and replenish nutrients lost during menstruation.
Beef and bone broth provide heme iron and zinc, helping to restore iron levels if you’re experiencing heavy bleeding.
Coconut aminos + veggies bring in minerals and antioxidants to fight fatigue and support detox pathways.

When you’re on your period, your body craves grounding, nourishing meals — and this casserole checks every box.
Tips for Success
Make ahead: Assemble the casserole up to 24 hours in advance, refrigerate, and bake when ready.
Customize your veggies: Don’t be afraid to toss in mushrooms, corn, or zucchini for extra variety.
Add protein variety: Swap ground beef for lamb or turkey depending on your taste (or hormone support needs).

Final Thoughts
This casserole is comfort food with purpose — warm, hearty, and designed to fuel your body through different phases of your cycle. Whether you’re deep into cycle syncing or just want a nutrient-dense dinner, it’s a dish worth bookmarking.
✨ If you try this recipe, make sure to tag me in your reel recreations so I can cheer you on in the kitchen!
Sweet Potato Shepherd’s Pie
This healthy shepherd’s pie (technically cottage pie!) uses ground beef, veggies, and a creamy sweet potato topping. Gluten-free & dairy-free friendly comfort food.
Servings: 4-6 Prep: 10 MIN Cook time: 40 MIN
Ingredients
Filling
1 white onion, diced
2 carrots, peeled and diced
4 cloves garlic, minced
2 Tbsp tomato paste
1 lb ground beef
½ cup beef bone broth
4 Tbsp coconut aminos (or 2 Tbsp Worcestershire + 2 Tbsp coconut aminos for less sweetness)
1 Tbsp Italian seasoning
1 tsp paprika
1 tsp salt
1 tsp black pepper
1 Tbsp arrowroot flour + 1 Tbsp water (slurry)
½ cup frozen peas
½ cup frozen green beans (or other mixed veggies on hand)
Mashed Sweet Potato Topping
2 large sweet potatoes, peeled and cubed
2 Tbsp grass-fed butter, ghee, or coconut oil
¼ cup milk of choice (dairy-free if preferred)
½ tsp garlic powder
¼ tsp smoked paprika
Salt and black pepper, to taste
Optional: shredded cheese for topping
For Serving
Fresh parsley, chopped
Directions
Prepare the Sweet Potatoes
Place peeled, cubed sweet potatoes in a large pot of salted water.
Bring to a boil and cook 12–15 minutes, until fork tender.
Drain, then mash with butter (or oil), milk, garlic powder, smoked paprika, salt, and pepper. Set aside.
Cook the Filling
Preheat oven to 375°F.
In a 12-inch oven-safe skillet (cast iron works well), sauté the onion in a little oil for 3–5 minutes until softened.
Add ground beef, garlic, and carrots. Cook 5–6 minutes, breaking up the beef, until browned.
Stir in tomato paste, coconut aminos (or Worcestershire + coconut aminos), Italian seasoning, paprika, salt, and pepper. Cook 2–3 minutes to deepen flavor.
Add bone broth, slurry, peas, and green beans. Stir well and simmer 2–3 minutes until sauce thickens.
Assemble & Bake
Spread the mashed sweet potatoes evenly over the filling.
If using cheese, sprinkle on top.
Bake uncovered for 25 minutes, until lightly golden.
Serve
Garnish with fresh parsley and serve warm.
✨ Notes & Tips
For a smoother topping, whip the sweet potatoes with a hand mixer.
Swap in ground turkey or lamb for variety.
Make ahead: Assemble the shepherd’s pie, cover, and refrigerate up to 24 hours. Bake as directed.

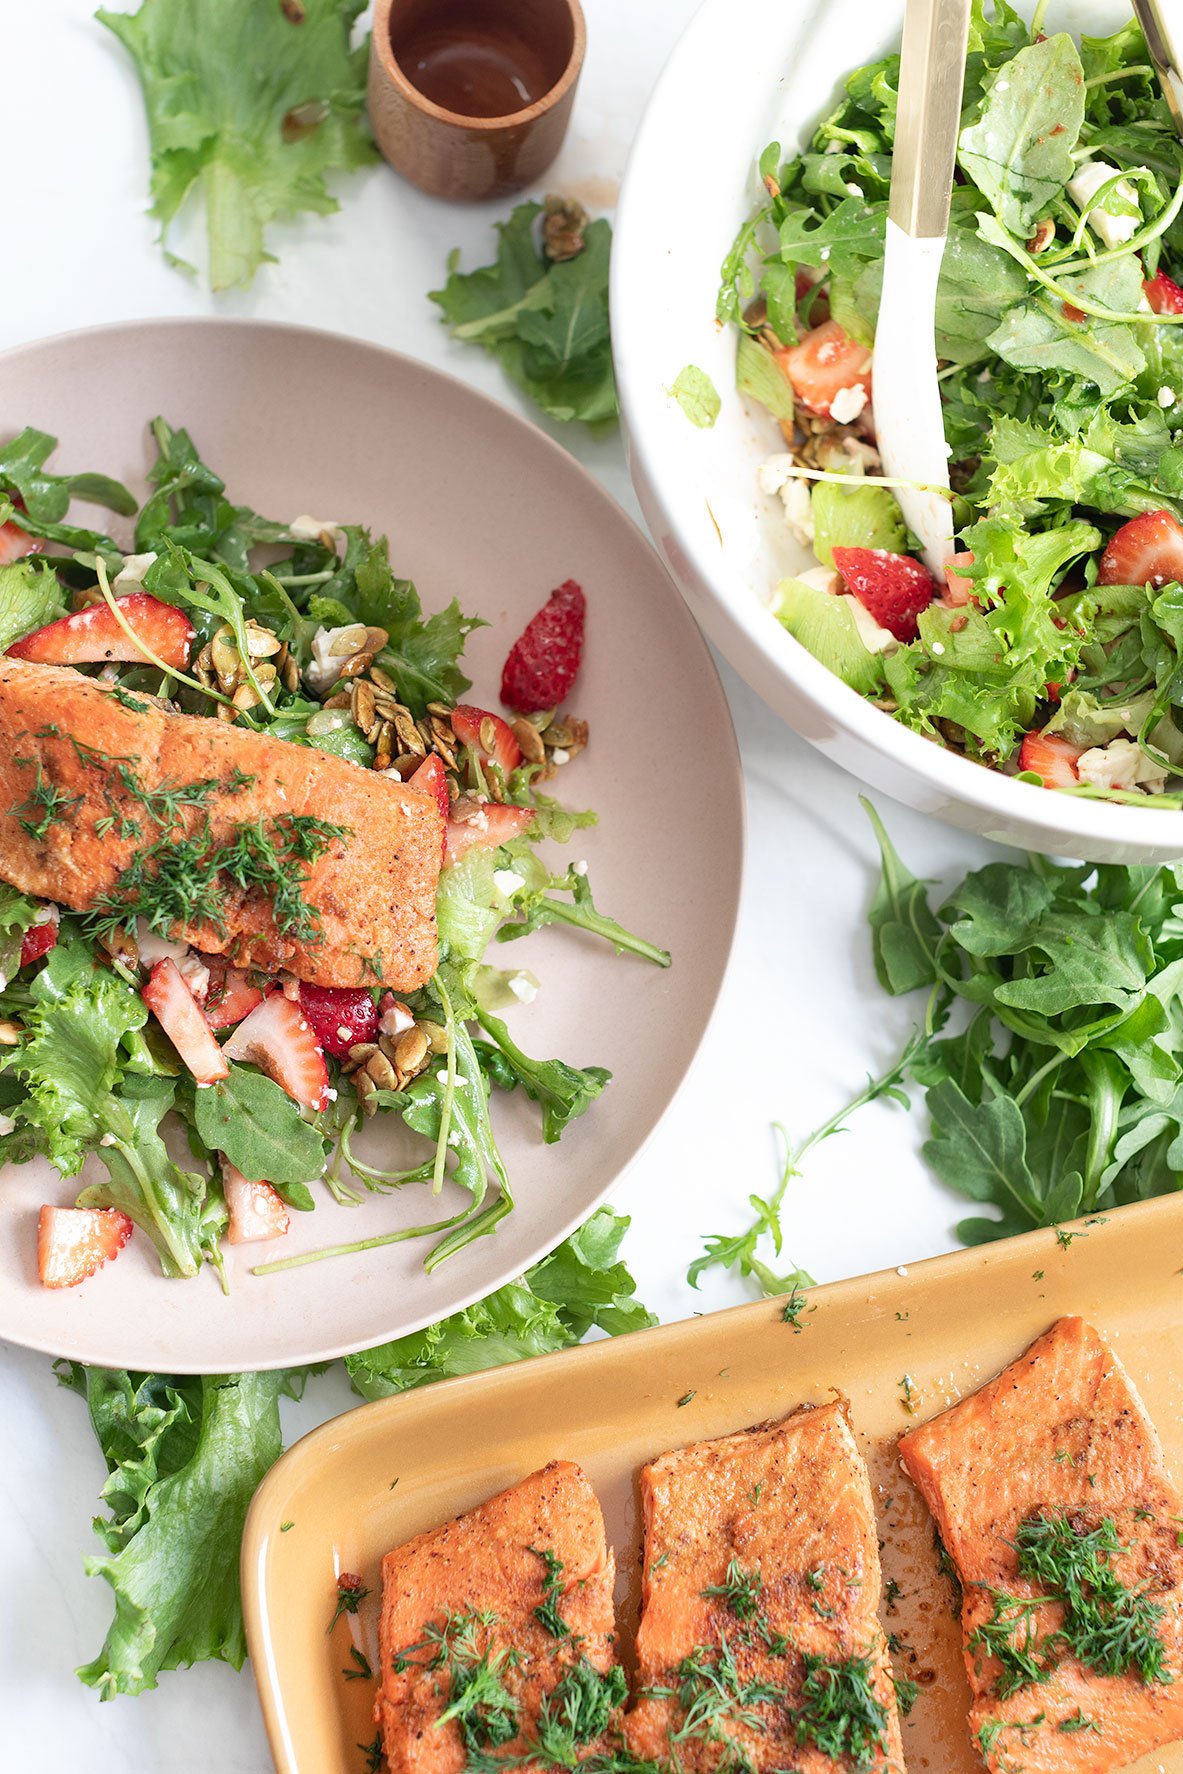
Strawberry Salmon Salad
Simple strawberry salmon salad requires less than six ingredients, your preferred salmon seasoning, and the option of homemade or store-bought dressing - perfect for effortless summer days!
Simple strawberry salmon salad requires less than six ingredients, your preferred salmon seasoning, and the option of homemade or store-bought dressing - perfect for effortless summer days!

I've been preparing this salad throughout the summer! Why? Because it's nutritious, rejuvenating, and incredibly simple to whip up. Everything can be ready in less than 30 minutes, making it an ideal choice for a quick weeknight dinner or for meal prepping for lunch.

TIPS ABOUT STRAWBERRY SALMON SALAD
Simplicity is key! This recipe is all about keeping things easy. I personally opt for my beloved strawberry vinaigrette from the store, but you can also whip up a speedy honey vinaigrette dressing from my alternative strawberry salad recipe.
This salad recipe is simple with just a few ingredients. If you feel like enhancing it, consider incorporating red onions, avocado, or substituting pepitas with pecans or almonds.
In this salad recipe, salmon takes the spotlight due to its quick cooking time and the avoidance of heating up the oven on a hot summer day. To ensure quality and sustainability, opt for wild-caught Alaskan or Sockeye salmon.
To transform this into a lunch meal prep, opt for glass containers when packing salads. This choice helps maintain freshness and prevents sogginess. I would also separate the ingredients like keep the salad undressed and dressing in a separate container and store the cooked salmon separately. (salmon refrigerate up to 3 days).

TO PREPARE THE EASIEST TOASTED HONEY PEPITAS
Heat a skillet over medium-high heat without adding any oil.
Spread pepitas in the skillet to form a single layer and shake occasionally.
Continue shaking until they turn golden brown (4-5 minutes). Transfer the toasted pepitas to a bowl to cool, then add a pinch of salt and 1 tablespoon of honey.
Stir until the seeds are well coated and set aside to cool.

Watch the video below to see how simple it is to prepare this salad!
If you try this recipe, let us know! Leave a comment, rate it, and don’t forget to tag a photo to #fromtherootsblog on Instagram. We love seeing what you come up with!
Simple strawberry salmon salad requires less than six ingredients, your preferred salmon seasoning, and the option of homemade or store-bought dressing - perfect for effortless summer days!
SERVINGS: 4 | PREP TIME: 10 MIN | COOK TIME: 15 MIN
Ingredients
2 - 4 salmon filets
1-2 Tbsp go to salmon seasonings*
4-8 cups favorite salad greens (I used half arugula half mixed)
1 cup strawberries, hulled and sliced
¼ cup pepitas
¼ cup crumbled feta
1 tbsp honey
¼ cup strawberry balsamic vinaigrette*
salt + pepper to taste
fresh dill for garnish, optional
Directions
Prepare Toasted Honey Pepitas:
1) Heat a skillet over medium-high heat without adding any oil. Spread pepitas in the skillet to form a single layer and shake occasionally. Continue shaking until they turn golden brown (4-5 minutes). Transfer the toasted pepitas to a bowl to cool, then add a pinch of salt and 1 tablespoon of honey. Stir until the seeds are well coated and set aside to cool.
To prepare the salmon:
1) Season your salmon with your favorite seasonings (refer to the notes below for my recommendations). Heat oil in a skillet over medium-high heat until it is hot and shimmering. Cook the salmon without moving it, skin side up, until it turns golden and crisp, approx. 4 minutes. Gently flip the fillets and lower the heat to medium. Cook until it reaches your desired level of doneness, around 4-5 minutes. Finally, transfer the salmon to a platter to cool.
Preparing the salad:
1) Coat the salad greens in dressing in a large mixing bowl. Add the remaining ingredients like toasted pepitas, feta, strawberries, salt, and pepper. Top it off with a salmon filet and savor the dish!
Notes:
Choose whatever greens you would like. I used arugula and mixed greens but you can also use spinach, butter lettuce, kale or romaine.
When it comes to my salmon, I favor a classic garlic powder, smoked paprika, salt, pepper and splash lemon juice and chopped fresh dill over. If you need more guidance, there are many salmon or fish focus seasonings that you can use.

Melon Berry Summer Salad
Melon Berry Summer Salad - A refreshing salad made with seasonal, rich produce to revitalize you on a hot summer day!
Melon Berry Summer Salad - A refreshing salad made with seasonal, rich produce to revitalize you on a hot summer day!

Summer is the prime season for melons, making it the perfect time to savor a refreshing salad filled with summer produce to wrap up the season.
This vibrant salad features a mix of summer produce such as blueberries, cucumbers, avocados, cantaloupe, along with robust veggies like shaved Brussel sprouts and kale forming the base.
For a protein boost, grilled shrimp is a great addition. It complements the citrusy and refreshing flavors of the salad, and you don't even need to use the oven. Leftover cold shrimp also pairs well with the salad.


HOW TO MAKE THE CITRUS VINAIGRETTE
Crafting the Citrus Vinaigrette is simple. Combine oil, herbs, seasonings, Dijon mustard, honey, and any citrus fruit you have on hand. In this recipe, half a grapefruit was squeezed, which adds a perfect touch to the salad.
Use the remaining half of the grapefruit to create a delightful paloma cocktail or mocktail to complement the meal. (recipe here)


If you try this recipe, let us know! Leave a comment, rate it, and don’t forget to tag a photo to #fromtherootsblog on Instagram. We love seeing what you come up with!
Melon Berry Summer Salad - A refreshing salad made with seasonal, rich produce to revitalize you on a hot summer day!
SERVINGS: 4 | PREP TIME: 10 MIN | COOK TIME: 10 MIN
Ingredients
salad components
2 cups shaved brussels sprouts
2-4 cups kale (de-stemmed, leaves torn into bite sized pieces)
1 cup or 3 mini cucumbers, sliced
1 avocado, diced
½ small red onion, sliced
½ cup crumbled feta or goat cheese
1 cup fresh blueberries
¼ cup small cantaloupe, diced
¼ cup sliced almonds
Optional: 1 lb grilled seasoned shrimp
Vinaigrette dressing:
½ grapefruit (juice)
¼ cup avocado oil
1 Tbsp honey
1 Tbsp dijon mustard
1 tsp salt
½ tsp black pepper
½ tsp garlic powder
½ tsp oregano
Directions
1) To prepare the dressing: Combine all ingredients in a small bowl or mason jar. If using a mason jar, seal the lid and shake vigorously for 30 seconds until the dressing is well mixed. If using a bowl, whisk the ingredients together until they are combined.
2) In a large salad bowl, combine shaved Brussels sprouts and kale. Pour the dressing over the greens and toss until they are evenly coated. Finally, add your remaining toppings and serve!
3) Enjoy this dish as a side salad or as a main course alongside grilled shrimp or your preferred protein source!

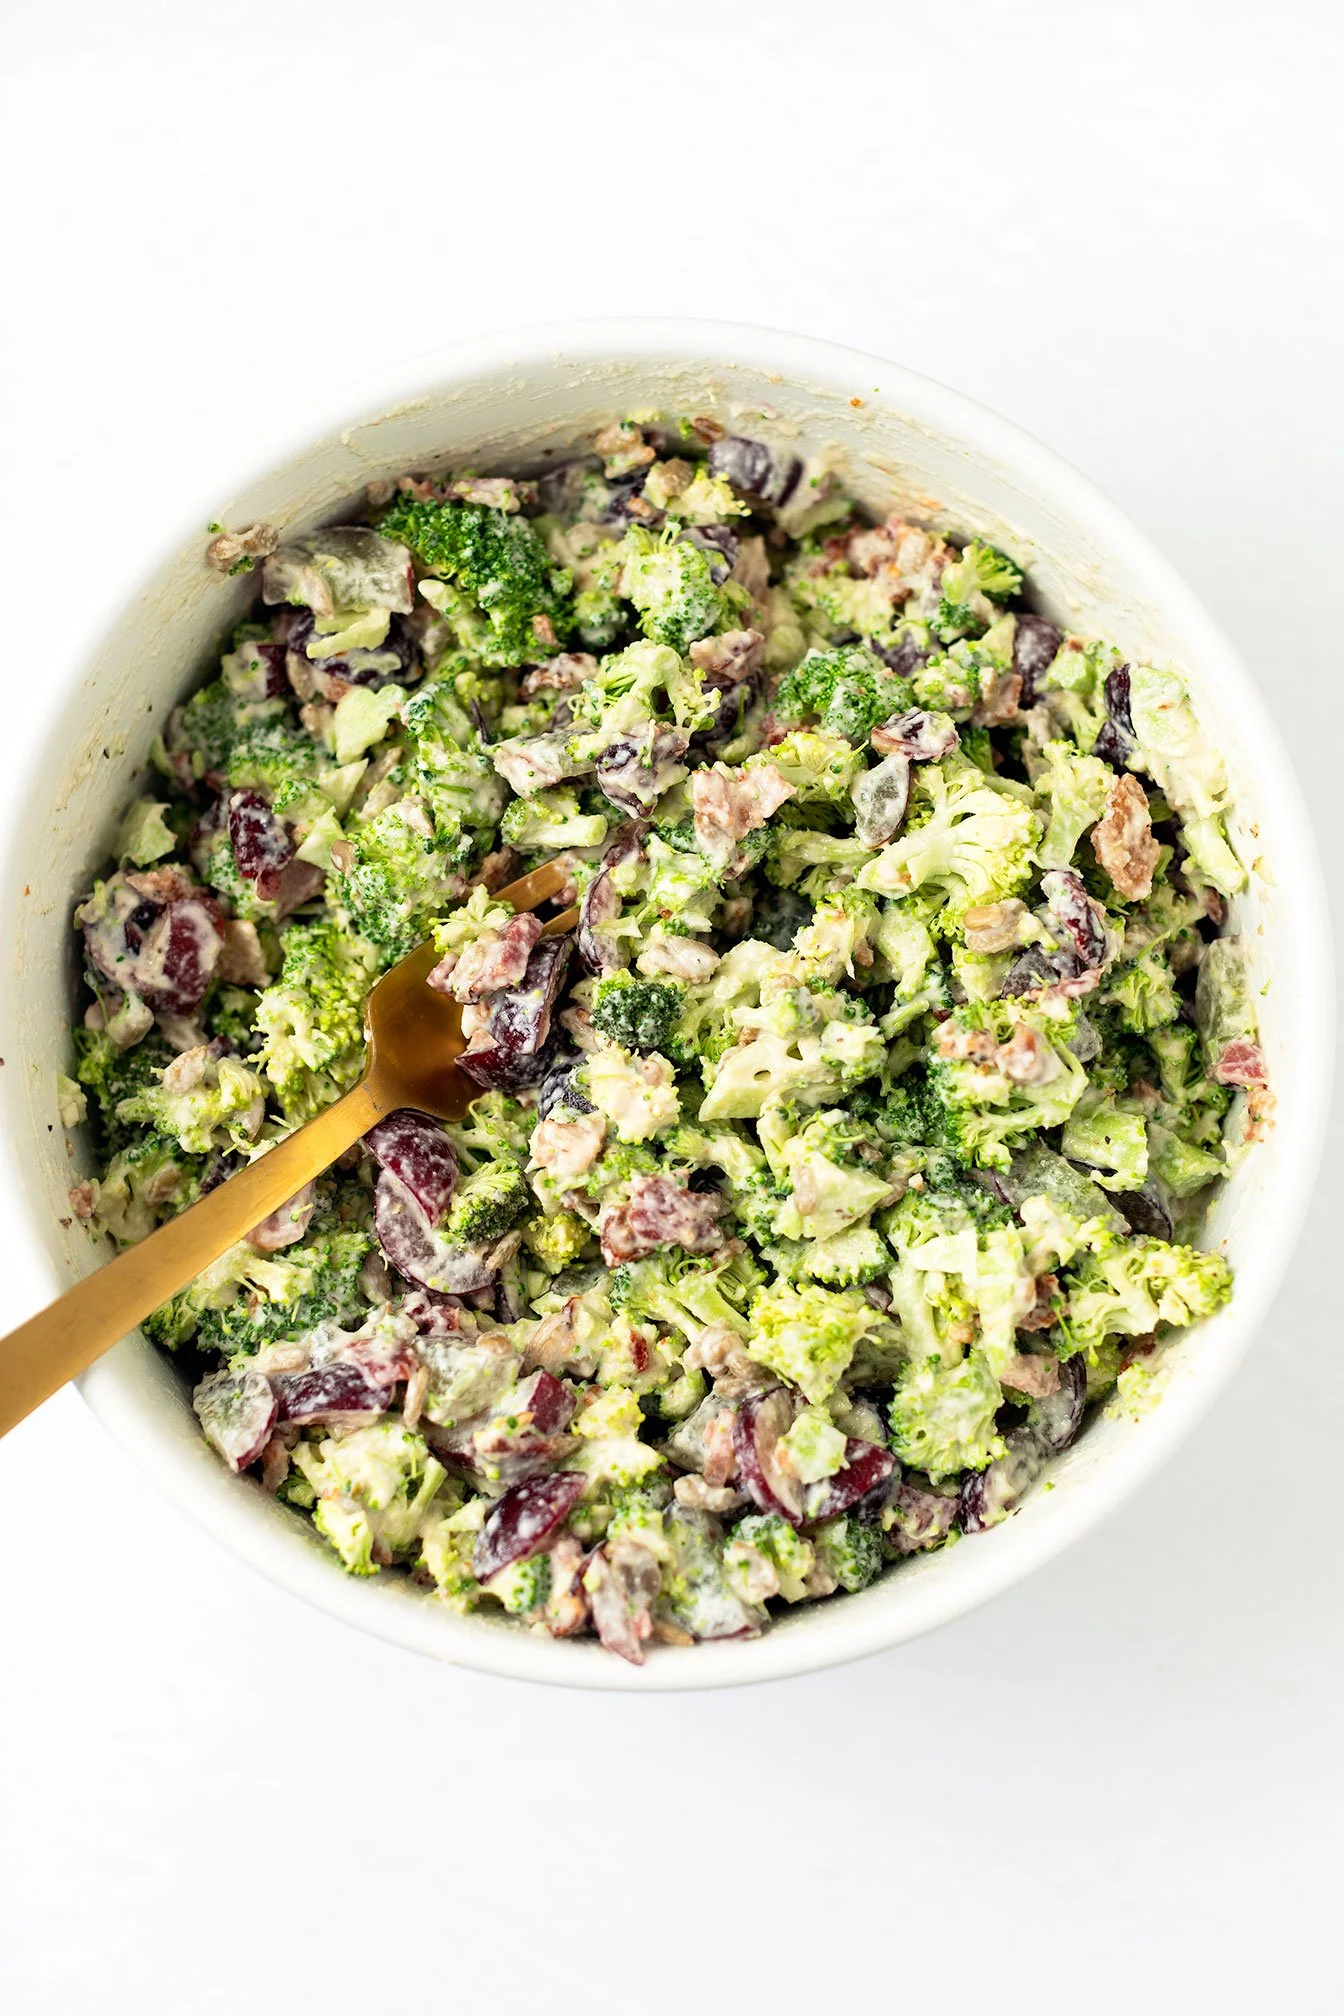
Broccoli Salad
The ultimate dairy and gluten-free broccoli salad for any occasion. Your guests will never suspect it's actually good for them!
The ultimate dairy and gluten-free broccoli salad for any occasion. Your guests will never suspect it's actually good for them!

BROCCOLI SALAD RECIPE HIGHLIGHTS
Incredibly simple to prepare!
The dairy-free dressing will quickly become your preferred choice for any dish. It's naturally sweetened and provides a good balance of fat and protein.
Perfect for preparing in advance, making it suitable for various occasions such as barbecues, potlucks, or weekday lunches.
Ideal for those who dislike red onions! *However, if you're a fan like me, feel free to include ⅓ cup of red onion in the salad!
I've been making this for years, and it's always a big hit! #noleftovers

TIME SAVING TIPS BEFORE AN EVENT
Buy fresh pre-cut broccoli or prepare and wash your broccoli the day before the event.
Cook bacon for breakfast, setting aside some for breakfast and chopping the rest for the broccoli salad.
Soak cashews overnight to make the dressing the next day, or boil them for 10 minutes.
Remember to chill the recipe in the fridge. This allows the broccoli to absorb the dressing, enhancing the flavor of the salad!

Looking for more nutritious and enjoyable crowd-pleasing recipe ideas? Explore: Apple Pecan and Bacon Salad with Caramelized Shallot Vinaigrette Dressing, Hasselback Sweet Potatoes, Prosciutto Wrapped Figs, Roasted Beet Hummus.
If you try this recipe, let us know! Leave a comment, rate it, and don’t forget to tag a photo to #fromtherootsblog on Instagram. We love seeing what you come up with!
The ultimate dairy and gluten-free broccoli salad for any occasion. Your guests will never suspect it's actually good for them!
Servings: 6 Prep: 15 MIN Cook time: 0 MIN
Ingredients
For the salad
2 large broccoli crowns (florets only), finely chopped
½ cup bacon, chopped
1 ½ cups seedless red grapes, quartered
⅓ cup dried cranberries or dried cherries
⅓ cup roasted or raw sunflower seeds
2 Tbsp lemon juice
S+P to season
For the dressing
1 cup raw cashews, soaked
¼ cup water
2-4 Tbsp pure maple syrup
2 Tbsp apple cider vinegar
½ tsp minced garlic
1 tsp sea salt
½ tsp ground black pepper
Instructions
For the dressing: Place cashews in a bowl and cover cashews with water and soak for 2 hours or overnight. (if you are short on time, soak them in boiling water for 10 min).
Drain cashews and transfer to blender with the rest of the dressing ingredients. Blend until completely smooth and creamy. If dressing is too thick, add 1 Tbsp increments of water until desired creaminess. *2-4 Tbsp syrup is for desired sweetness.
For the salad, Place broccoli, grapes, sunflower seeds, dried cranberries, bacon bits and lemon juice in a large mixing bowl. Add dressing and toss thoroughly to coat. Season with salt and pepper and lemon juice to taste. Serve chilled.

Gluten Free Walking Tacos
Have you ever tried a walking taco? It's the perfect meal for those who are short on time, love customization, and want to keep it healthy. This meal is perfect for quick lunches, lazy family dinners, or even game night!
When I was a child, my family would make tacos in individual-sized chip bags like Fritos or Doritos. This allowed us to choose our own toppings, while also eating right out of the bag, making it mess-free for our parents. It was a delightful experience!
Healthy Walking Tacos: A Quick, Fun, and Customizable Meal

Have you ever tried a walking taco? It's the perfect meal for those who are short on time, love customization, and want to keep it healthy. This meal is perfect for quick lunches, lazy family dinners, or even game night!


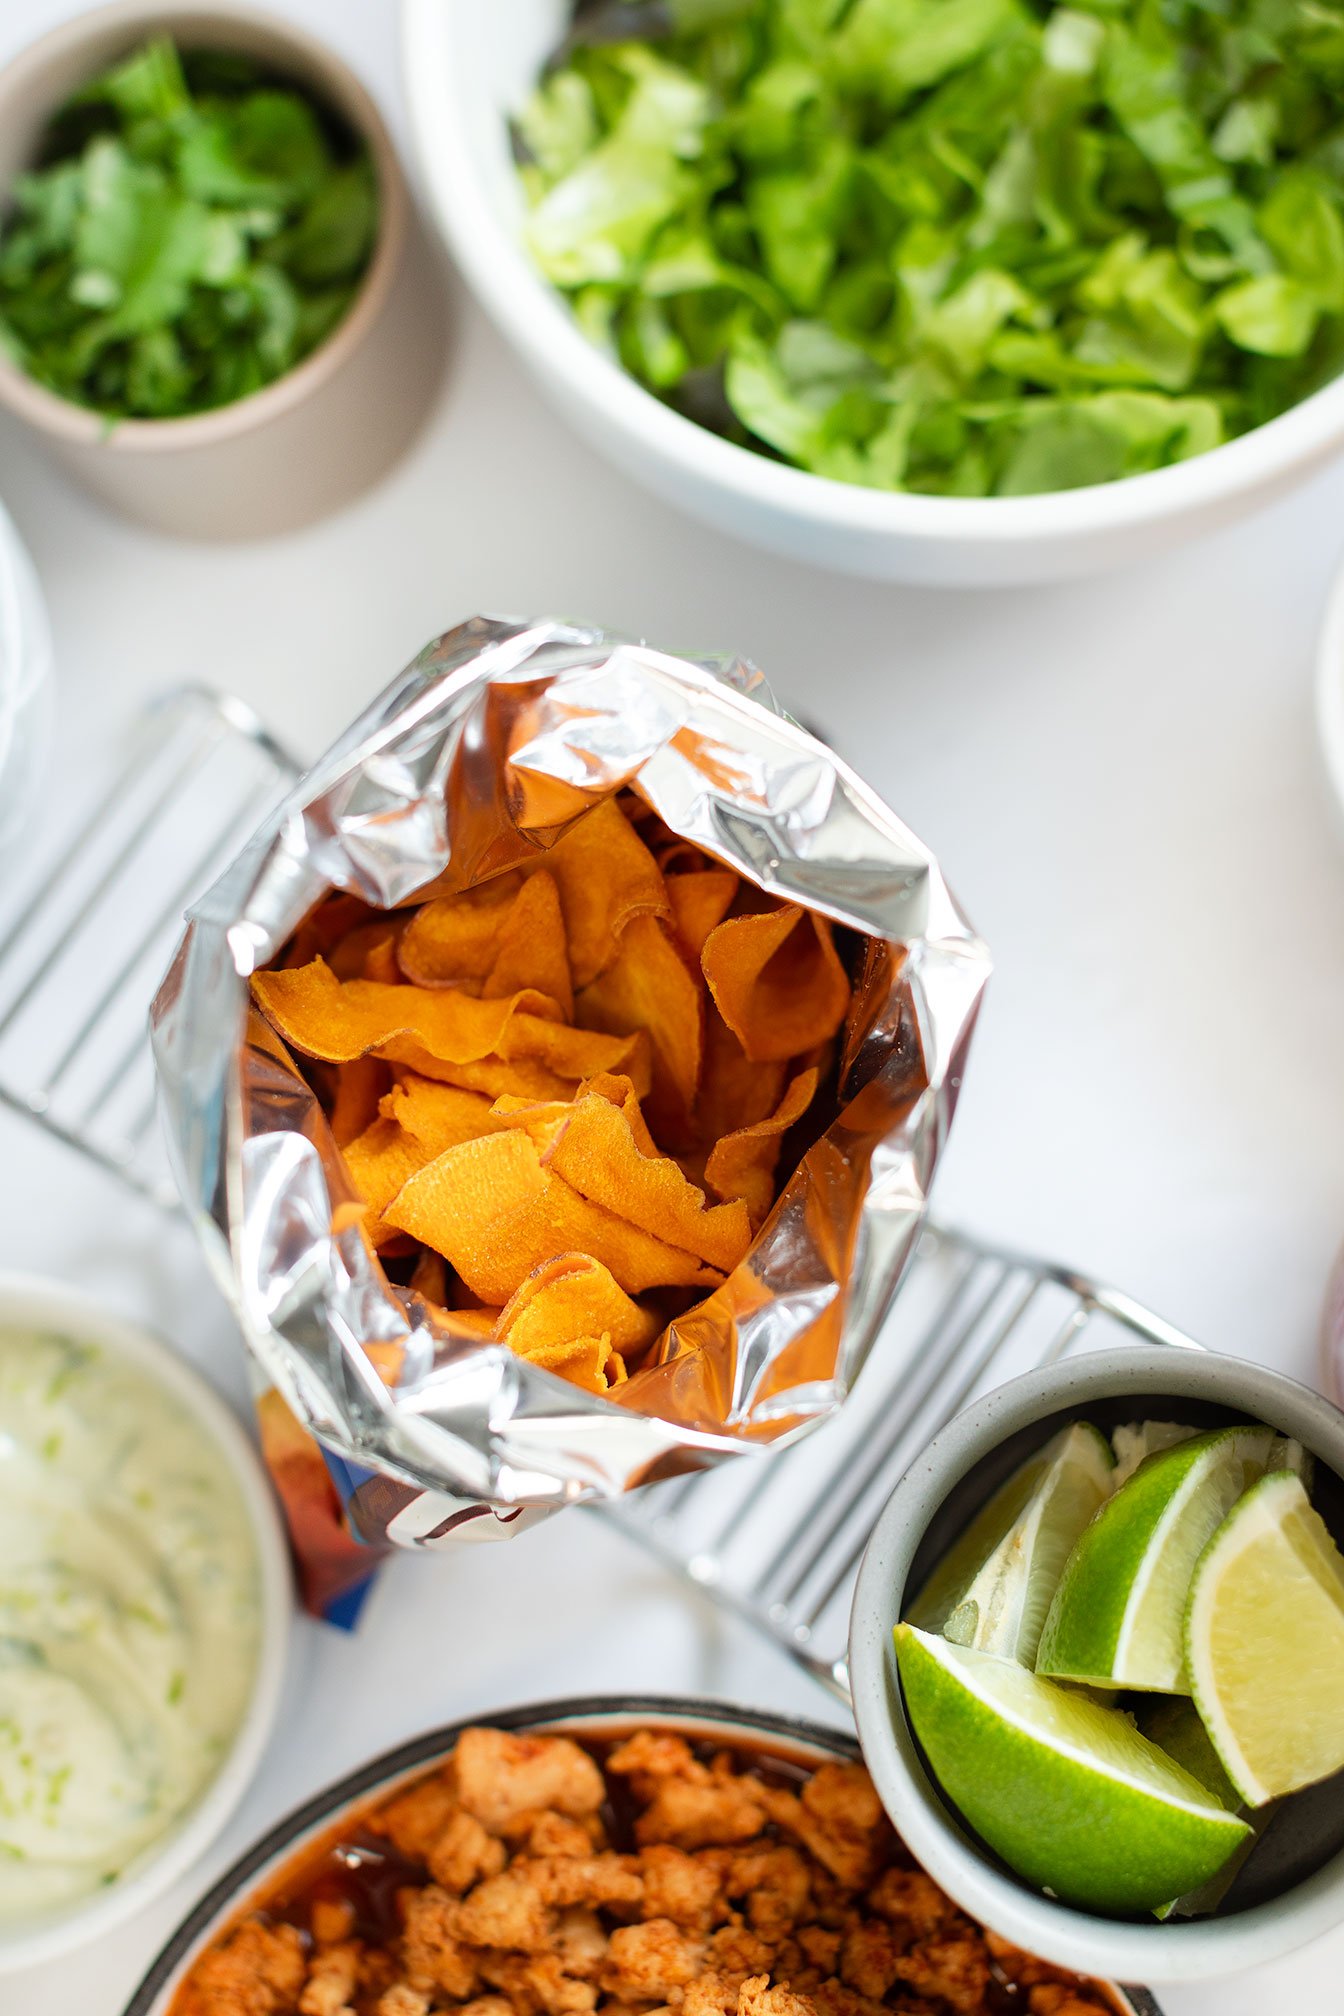
When I was a child, my family would make tacos in individual-sized chip bags like Fritos or Doritos. This allowed us to choose our own toppings, while also eating right out of the bag, making it mess-free for our parents. It was a delightful experience!
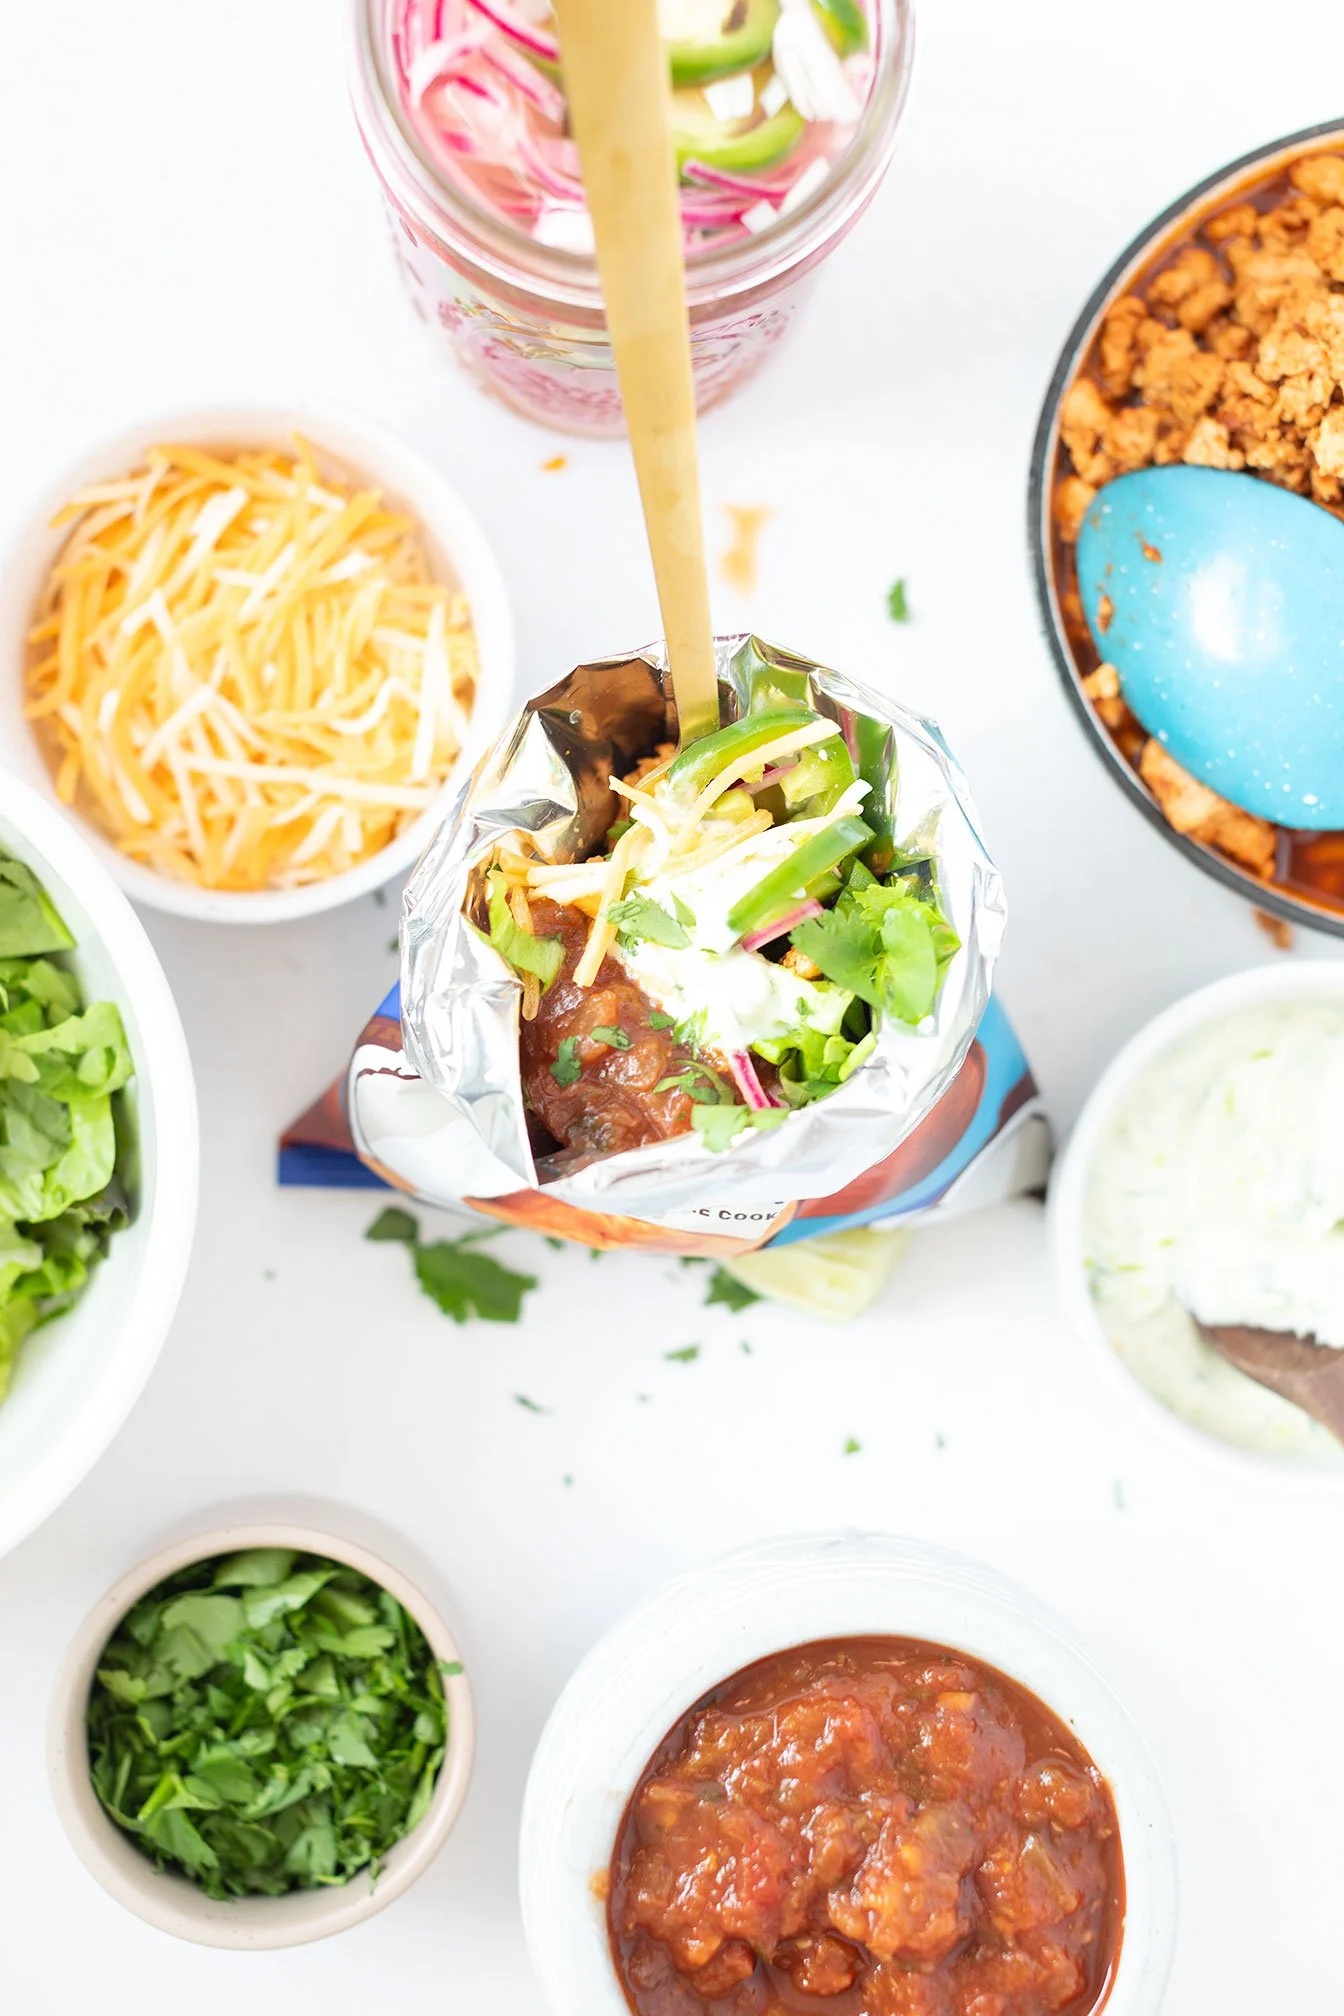

HOW TO MAKE YOUR WALKING TACO
Assembling your walking taco is easy and fun! Just gather all your favorite taco toppings and go from there. You can even choose healthy and gluten-free options!
grass-fed ground meat
shredded lettuce
fresh organic salsa
lactose free or organic raw shredded cheese
pickled onions (with addition of jalapeños) pg. 54 in cookbook
avocado lime crema pg. 45 in cookbook
Gluten-free chips that are made in premium avocado or coconut oil like Jackson’s chips.

Want more healthy and fun Mexican inspired recipes? Check out: Mexican eggs Benedict, Paleo Crunchwrap Supreme, and Mexican Harvest Turkey Chili.
If you try this recipe, let us know! Leave a comment, rate it, and don’t forget to tag a photo to #fromtherootsblog on Instagram. We love seeing what you come up with!
Servings: 4 Prep: 10 MIN Cook time: 10 MIN
Ingredients
To make taco meat:
1 lb grassfed ground meat (beef, chicken, turkey)
1 packet of siete foods taco seasoning
⅓ cup water
Toppings:
individual chip bags (favorites: Jackson’s Chips, Siete Foods, Barnana Plaintain chips)
shredded lettuce
diced tomatoes or salsa
avocado
lime wedges
cilantro
cheese or queso
sour cream or greek yogurt
Instructions:
To a skillet, add 1 Tbsp avocado oil over medium high heat. Add your ground meat to the skillet and break apart as it cooks. Mix in the seasonings and water once browned. Transfer the meat into a bowl and set aside until ready to assemble walking tacos.
Prepare the rest of the toppings of your choice!
When ready to assemble, take individual sized chip bags and roll down the tops. (You can also add chips to a bowl if you don’t have chip bags!) Fill the bags or bowl with taco meat and the rest of your desired toppings. Enjoy!