Sort by Category
- May 2024
- February 2024
- January 2024
- December 2023
- November 2023
- October 2023
- September 2023
- August 2023
- July 2023
- March 2023
- February 2023
- January 2023
- December 2022
- November 2022
- October 2022
- September 2022
- August 2022
- June 2022
- May 2022
- April 2022
- March 2022
- February 2022
- January 2022
- December 2021
- November 2021
- October 2021
- September 2021
- August 2021
- July 2021
- June 2021
- May 2021
- April 2021
- March 2021
- February 2021
- January 2021
- December 2020
- November 2020
- October 2020
- September 2020
- August 2020
- July 2020
- June 2020
- May 2020
- April 2020
- March 2020
- February 2020
- January 2020
- December 2019
- November 2019
- October 2019
- September 2019
- August 2019
- July 2019
- June 2019
- May 2019
- April 2019
- March 2019
- February 2019
- January 2019
- December 2018
- November 2018
- October 2018
- September 2018
- August 2018
- July 2018
- June 2018
- May 2018
- April 2018
- March 2018
- February 2018

Fresh and Easy Ceviche: 2-Ways
This is sad to say, but my first experience eating ceviche was about six months ago when trying out a new Peruvian restaurant with a girlfriend. She ordered ceviche for the table and after having one bite, I was blown away! Why haven’t I had this before!? It seems like I was doing a disservice to my taste buds for not having it sooner!
So instead of dragging her to this restaurant to help translate that, “I need ceviche!”, I just make it at home! And you can, too! Ceviche is actually very easy to make.
Fresh and Easy Ceviche: 2-Ways - Salmon Mango and Spicy Jalapeno Shrimp Ceviche are tasty dishes that can be served over nachos, tostadas, avocado boats, or with chips!

This is sad to say, but my first experience eating ceviche was about six months when I was trying out a new Peruvian restaurant with a girlfriend. She ordered ceviche for the table and after having one bite, I was blown away! Why haven’t I had this before!? It seems like I was doing a disservice to my taste buds for not having it sooner!


So instead of dragging her to the restaurant every time I need translating: “I need ceviche!”, I just make it at home! And you can, too! Ceviche is actually very easy to make.
The ingredients for ceviche:
Raw fresh fish (snapper, sea bass, halibut, mahi-mahi, tilapia, shrimp, salmon, octopus)
Citrus juice (lemon, lime, oranges)
Salt
Add-ins: mango, red onion, avocado, cilantro, jalapeno, tomatoes
To show how easy it is to make ceviche, I have provided 2-ways that you can make ceviche as well as 3-ways to serve it. You can serve ceviche over nachos, tostadas, avocados or with chips; the possibilities are endless!

Ceviche pairs perfectly with a margarita or a Paloma, just saying! ;)

If you try this recipe, let us know! Leave a comment, rate it, and don’t forget to tag a photo to #fromtherootsblog on Instagram. We love seeing what you come up with!
Fresh and Easy Ceviche: 2-Ways - Salmon Mango and Spicy Jalapeno Shrimp Ceviche are tasty dishes that can be served over nachos, tostadas, avocado boats, or with chips!
Ingredients
Salmon Mango Ceviche
1 lb raw salmon (skinless and cubed)
1 fresh mango (diced)
1 cup lime juice from 6 limes
2 roma tomatoes (diced)
½ red onion (diced)
¼ bunch cilantro (chopped)
1 large avocado (cubed)
1 small shallot (minced)
½ tsp pink himalayan salt
Spicy Jalapeno Shrimp Ceviche
1 lb shrimp (raw or cooked) peeled, deveined, and diced
1 cup lime juice from 6 limes
2 roma tomatoes (diced)
½ red onion (diced)
¼ bunch cilantro (chopped)
1 large avocado (cubed)
1 large jalapeno (diced)
1 small shallot (minced)
½ tsp pink himalayan salt
Directions
Add chopped shrimp or salmon to a large bowl and stir in 1 cup of freshly squeezed lime juice, ½ tsp salt, and minced shallots. Refrigerate and marinate. See Notes for marinating times.
Dice remaining ingredients: avocado, tomato, red onion, jalapeno, mango, and cilantro.
Once the seafood is done marinating, stir in the diced ingredients.
Season with salt and pepper and serve over nachos, tostadas, avocado boats, or with chips!
Notes
Spicy mayo to go over nachos? ¼ cup mayonnaise + 2 tsp sriracha + ½ tsp lime + 1 tsp water.
Feel free to sub shrimp or salmon for ahi tuna and diced cucumber to the ceviche.
Marinating times:
1 ½ - 2 hours for raw shrimp and up to 30 minutes for cooked shrimp
30 min to 1 hour for raw salmon

The Best Gluten-Free Skillet Cornbread
During the first few weeks of quarantine, I was a baking machine. I created all the things, paleo banana nut bread, muffins, cookies, sourdough bread, you name it! It was so bad, I had to start freezing the leftovers because my fridge couldn’t handle it!
I was also creating recipes using ingredients from my pantry. Like most, I wasn’t sure if the grocery stores were going to be closed or only provide limited ingredients so I got creative in the fast! But since I’m cooking for one, having a one-pot meal goes a long way!
The BEST gluten-free skillet cornbread made with just 10 ingredients! Fluffy, perfectly sweet, crumbly and so tasty!

During the first few weeks of quarantine, I was a baking machine. I created all the things, paleo banana nut bread, muffins, cookies, sourdough bread, you name it! It was so bad, I had to start freezing the leftovers because my fridge couldn’t handle it!

I was also creating recipes using ingredients from my pantry. Like most, I wasn’t sure if the grocery stores were going to be closed or only provide limited ingredients so I got creative in the fast! But since I’m cooking for one, having a one pot meal goes a long way!

But this recipe, I was completely fine with that! Using all my canned items to make chili (I never make chili the same so sorry if I can’t provide a chili recipe! haha) I also made skillet cornbread, and oh boy, was it good!

Growing up, my mom would make cornbread using Jiffy cornbread mix. It was my favorite version because I would rather have a sweeter cornbread than savory. Though, I do love adding fun add-on ingredients like minced jalapenos or green chilies to give it a kick!

So if you are #teamjiffy, then you will love this recipe! Enjoy as a side with your fall and winter recipes or as an appetizer!
If you try this recipe, let us know! Leave a comment, rate it, and don’t forget to tag a photo to #fromtherootsblog on Instagram. We love seeing what you come up with!
The BEST gluten-free skillet cornbread made with just 10 ingredients! Fluffy, perfectly sweet, crumbly and so tasty!
Ingredients
1 cup yellow cornmeal
1 cup gluten-free 1 to 1 baking flour (or paleo baking flour)
¾ cup unsweetened plant based milk
¼ cup cup organic cane sugar
¼ cup extra virgin olive oil
2 eggs room temperature; lightly beaten
1 Tbsp grass fed butter or coconut oil
1 tsp apple cider vinegar or lemon juice
1 ½ tsp baking powder
½ tsp baking soda
¼ tsp pink Himalayan sea salt
Directions
In a liquid measuring cup, measure out milk and add 1 tsp apple cider vinegar or lemon juice. Mix until combined and set aside. How to create “buttermilk” plant-based way!
Preheat the oven to 375 degrees. In a 9 inch cast iron skillet, melt 1 Tbsp grass fed butter or coconut oil on the stove top. Make sure the melted butter has coated the bottom and sides of the skillet. Set aside to cool.
Add dry ingredients to a large mixing bowl and whisk to combine.
In a medium mixing bowl, mix the oil, “buttermilk” mixture, and whisked eggs until combined.
Slowly pour the liquid mixture into the dry mixing bowl and whisk until fully combined.
The batter should be thick but pour-able. Add more cornmeal or flour if too wet or almond milk if too thick in 1 Tbsp amounts.
Pour batter into the prepared oiled skillet, lightly sprinkle some sugar over batter, and bake on a center rack for 25-30 minutes, or until the edges are light golden brown and a toothpick inserted into the center comes out completely clean.
Let cool completely in the pan for 10-15 minutes - set on a wire rack to speed the cooling process. To remove, run a dull knife around the edges to loosen, then slice and serve.
Serve with butter, maple syrup, or honey.
Store covered at room temperature for 2-3 days, or in the refrigerator for 3-4 days. Freeze up to a month.
Notes
Like a spicy kick in your cornbread? Feel free to mince in 1 jalapeno or green chilis to the batter.
I have not tested this recipe with other sweeteners such as coconut sugar or maple syrup so if you try to sub sugar out, the texture and flavor may be off.
Here are the brands I use for this recipe: GF 1 to 1 baking flour, yellow cornmeal, and paleo baking flour, organic cane sugar

Winter Pear Salad with Citrus Dijon Vinaigrette
If you haven’t noticed, there is now a salad recipe for every season.
SPRING - Strawberry Fields Salad
SUMMER - Grilled Shrimp Summer Salad
FALL - Fall Harvest Grain Bowl
WINTER - This one!
Well, I saved the best for last because this one is mighty tasty! Made with seasonal produce like pears, brussels sprouts, pomegranates, kale, and citrus fruits, it’s like the essence of winter but in the healthy form!
Winter Pear Salad with Citrus Dijon Vinaigrette - Seasonal side salad to pair perfectly with your next holiday meal.

If you haven’t noticed, there is now a salad recipe for every season.
SPRING - Strawberry Fields Salad
SUMMER - Grilled Shrimp Summer Salad
FALL - Fall Harvest Grain Bowl
WINTER - This one!


Well, I saved the best for last because this one is mighty tasty! Made with seasonal produce like pears, brussels sprouts, pomegranates, kale, and citrus fruits, it’s like the essence of winter but in healthy form!

Since we are using kale for this salad recipe, we will be following the same tip I wrote about in the fall harvest grain bowl post. But just as a refresher, we will be massaging the kale before assembling the salad. By massaging the kale, not only will your kale last longer in the fridge, but your body will digest the kale more easily by physically breaking it down with lemon, olive oil, and salt.

This salad also pairs really well with heartier dishes like rosemary & red wine-braised short ribs. You can also make this as a main dish and add protein like grilled chicken, roasted chickpeas, or skirt steak.

Not only does it pair well with dishes that are typically served during the holidays, the colors in the salad scream Merry Christmas!
If you try this recipe, let us know! Leave a comment, rate it, and don’t forget to tag a photo to #fromtherootsblog on Instagram. We love seeing what you come up with!
Winter Pear Salad with Citrus Dijon Vinaigrette - Seasonal side salad to pair perfectly with your next holiday meal.
Ingredients
Salad:
2 cups fresh kale (de-stemmed and chopped)
1 cup fresh arugula
1 cup shaved brussels sprouts
¼ cup toasted raw almonds (crushed)
¼ cup pomegranate arils
2 Tbsp feta or vegan violife feta (crumbled)
1 pear (sliced)
½ lemon
Orange zest
Citrus Dijon Vinaigrette:
¼ cup extra virgin olive oil
3 Tbsp apple cider vinegar
1 Tbsp honey
2 tsp dijon mustard
½ juice of fresh orange
½ tsp garlic powder
S&P
Directions
For the dressing: Combine all ingredients in a glass mason jar or small bowl and shake/mix until well combined. Set in fridge until ready to use on salad.
For the salad: In a medium bowl, add chopped kale to a medium bowl and squeeze the juice of half a lemon over and a couple pinches of salt. Massage lemon and salt into the kale. Add the rest of the salad ingredients to the bowl and top with dressing mixture when ready to serve.

Brown Butter Sage Mashed Sweet Potatoes
If you are not on the brown butter train, then you need to hop on board, real fast! The basic technique of melting butter at a certain heating point, not only changes the chemistry but also the flavor and aroma. Preparing butter in this way not only enhances the flavor of whatever you put into it but it also adds a rich nutty taste to the dish.
Brown Butter Sage Mashed Sweet Potatoes - Elevated mashed potatoes using brown butter and sage. (dairy-free/paleo/vegan-friendly)

If you are not on the brown butter train, then you need to hop on board, real fast! The basic technique of melting butter at a certain heating point, not only changes the chemistry but also the flavor and aroma. Preparing butter in this way not only enhances the flavor of whatever you put into it but it also adds a rich nutty taste to the dish.

So how do you make it? Well, it’s very easy actually! Add a stick of butter (I personally use pasture-raised butter or clarified ghee) to a pan on medium heat. As the butter slowly melts, swirl the pan occasionally to be sure the butter is cooking evenly.
You will notice that the color will turn from yellow to golden-tan to, finally, a toasty-brown. You will know that the butter is ready to take off the heat when you smell that nutty aroma! Transfer brown butter into a heat-proof bowl to cool.

So now that you are a pro at browning butter, we are taking it up a notch! When you melt the butter, simply add fresh sage leaves and mashed garlic. The infusion of flavors pairs perfectly with the subtle sweetness that is sweet potatoes.
Speaking of pairing, I will share the best main course that will couple perfectly with this recipe so stay tuned! In the meantime, you can use brown butter in just about any sweet or savory recipe.
If you try this recipe, let us know! Leave a comment, rate it, and don’t forget to tag a photo to #fromtherootsblog on Instagram. We love seeing what you come up with!
Brown Butter Sage Mashed Sweet Potatoes - Elevated mashed potatoes using brown butter and sage. (dairy-free/paleo/vegan-friendly)
Ingredients
4 medium sweet potatoes (peeled and cubed)
1 stick butter (pasture-raised, clarified ghee, or vegan butter)
4-6 fresh sage leaves
2-4 cloves of garlic (mashed)
½ cup plant-based milk
S&P
Directions
In a large pot, cover potatoes with water and add a generous pinch of salt. Bring to a boil and cook until totally soft, about 16-20 minutes. Drain and return potatoes to the pot.
Use a potato masher to mash potatoes until smooth.
Meanwhile, prepare the brown butter by adding a stick of butter to a pan on medium heat. As the butter slowly melts, swirl the pan occasionally to be sure the butter is cooking evenly. Add fresh sage leaves and mashed garlic while butter is cooking. As soon as the butter turns to a toasty-brown color, take the pan off the heat. Strain and transfer brown butter into the pot with the mashed potatoes.
Discard sage leaves. Mince garlic cloves and add to mashed potatoes. Add milk, salt, and pepper, and combine. Season to taste and serve!
Notes
If you would like to fry a sage leaf as a garnish, add a small pad of butter to a pan and fry in butter for 2-3 minutes on medium heat.
You can use regular potatoes for this recipe as well.
If you would like to mix things up/I love using half ghee/half butter for this recipe!
Makes 6-8 servings


Vibrant Pea Pesto Pasta Salad
As we enter spring, I wanted to create a pasta salad that showcases the vibrant colors of green! Not only is this recipe a crowd-pleaser, it’s also highly nutritious. As you may have already guessed, pesto is the star in this dish.
Where are my pesto lovers at!? Pesto is my absolute favorite when it comes to dips, sauces, or just straight out of the bowl. Unfortunately, most restaurants or pizzarias will have pesto that contains dairy. I either bear through it and deal with the repercussions later or just bring my own, lol.
Vibrant Pea Pesto Pasta Salad - Pasta salad that is made with fresh ingredients and loads of flavor! Dairy-free, gluten-free, and vegan.

As we enter spring, I wanted to create a pasta salad that showcases the vibrant colors of green! Not only is this recipe a crowd-pleaser, it’s also highly nutritious. As you may have already guessed, pesto is the star in this dish.
Where are my pesto lovers at!? Pesto is my absolute favorite when it comes to dips, sauces, or just straight out of the bowl. Unfortunately, most restaurants or pizzarias will have pesto that contains dairy. I either bear through it and deal with the repercussions later or just bring my own, lol.

This pesto is a lot like my 5-ingredient vegan pesto but with an upgrade. The pesto used in this dish contains more greens like arugula and watercress as well as one of my favorite vegetable, peas!

Other bright and colorful green vegetables that are added to this pasta salad are asparagus and broccolini. Like most of my pasta dishes, I use Banza pasta. Banza is a great gluten-free option that also contains a higher amount of protein, fiber, and less net carbs than most traditional pastas out there.
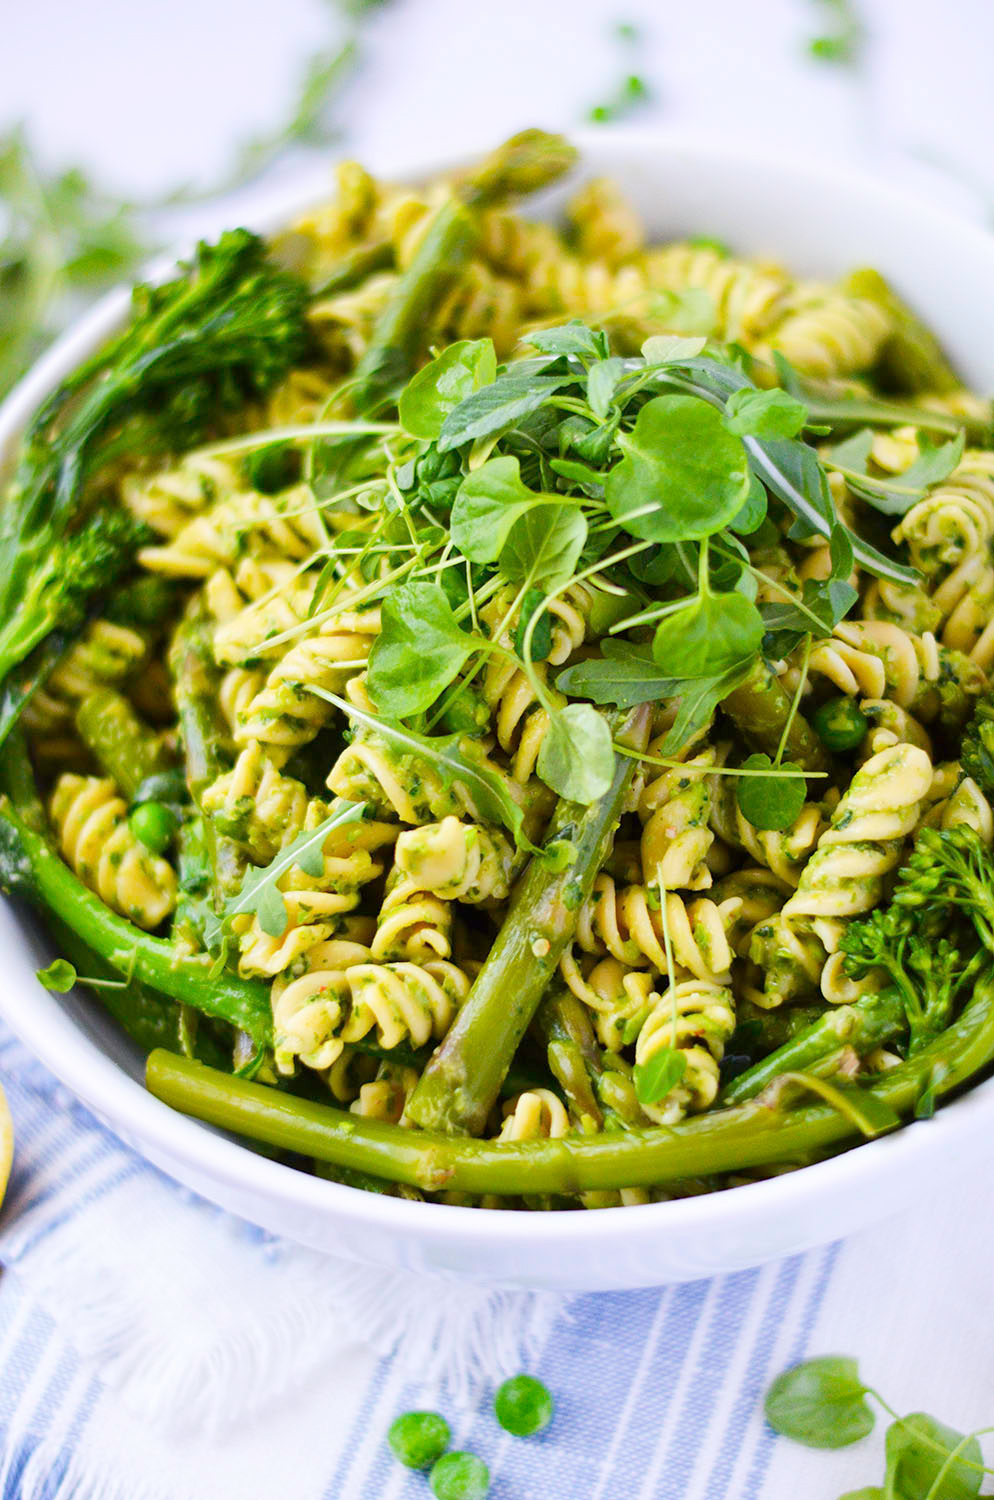
This vibrant pea pesto pasta salad is great on its own but also perfect as a side dish for your meal preps. Add a side of grilled chicken and you’re good to go!

As a Banza ambassador, I’m excited to announce that the first person who makes this dish and provides feedback will receive coupons for free Banza pasta! To qualify for this giveaway you must:
Make this recipe!
Leave a comment below.
Post in your Instagram story or feed a picture of your finished dish and add #fromtherootsblog .

I was not financially compensated for this post. All recipes, photos, and opinions are my own.
Vibrant Pea Pesto Pasta Salad - Pasta salad that is made with fresh ingredients and loads of flavor! Dairy-free, gluten-free, and vegan.
Ingredients
½ cup frozen peas
1 bunch broccolini
1 bunch asparagus
½ lemon (juice)
1 box (8 oz) Banza pasta rotini
PEA PESTO
7-9 raw almonds
4 cloves garlic
½ cup peas (frozen)
1 cup packed fresh basil
½ cup packed watercress and arugula
⅓ cup nutritional yeast
⅓ cup EVOO
½ lemon
S&P to season
Directions
Bring a large pot of water to a boil and add a generous pinch of salt. Once boiling, add pasta and cook according to package instructions. Drain and set aside. Drizzle with oil of choice and toss to prevent noodles from sticking.
While pasta is cooking, blanch asparagus and broccolini by filling a medium saucepan halfway with lightly salted water. Bring to a boil. While the water is heating, prepare the asparagus by breaking off any tough, white bottoms and cutting the spears into 1 to 2 inch sections. Add the asparagus and broccolini to the boiling water and lower the heat slightly to maintain a simmer. Cook for about 2 minutes and drain the hot water. Add the veggies to an ice bath after to stop the cooking process. Drain and set aside.
Make pesto by adding almonds and garlic to a food processor and pulse until finely chopped. Add the rest of the ingredients except oil and blend until combine. Slowly add in the olive oil until creamy and smooth, scraping down sides as needed. If mixture is too dry, add a little water. It should be thick but pourable.
Taste and adjust flavor as needed; set aside.
Add cooked pasta, broccolini, asparagus, and peas to a mixing/serving bowl and top with pesto. Squeeze half of lemon and toss to combine. Garnish with herbs, S&P, pine nuts, or hemp seeds (optional).
Best served fresh at room temperature. Store in refrigerator for up to 4 days.


