Sort by Category
- February 2024
- January 2024
- December 2023
- November 2023
- October 2023
- September 2023
- August 2023
- July 2023
- March 2023
- February 2023
- January 2023
- December 2022
- November 2022
- October 2022
- September 2022
- August 2022
- June 2022
- May 2022
- April 2022
- March 2022
- February 2022
- January 2022
- December 2021
- November 2021
- October 2021
- September 2021
- August 2021
- July 2021
- June 2021
- May 2021
- April 2021
- March 2021
- February 2021
- January 2021
- December 2020
- November 2020
- October 2020
- September 2020
- August 2020
- July 2020
- June 2020
- May 2020
- April 2020
- March 2020
- February 2020
- January 2020
- December 2019
- November 2019
- October 2019
- September 2019
- August 2019
- July 2019
- June 2019
- May 2019
- April 2019
- March 2019
- February 2019
- January 2019
- December 2018
- November 2018
- October 2018
- September 2018
- August 2018
- July 2018
- June 2018
- May 2018
- April 2018
- March 2018
- February 2018

Beet and Cabbage Sauerkraut
Sauerkraut does not have to be a daunting task, people! It can actually be pretty fun! Requiring 10-20 minutes of prep time, then letting nature take its course.
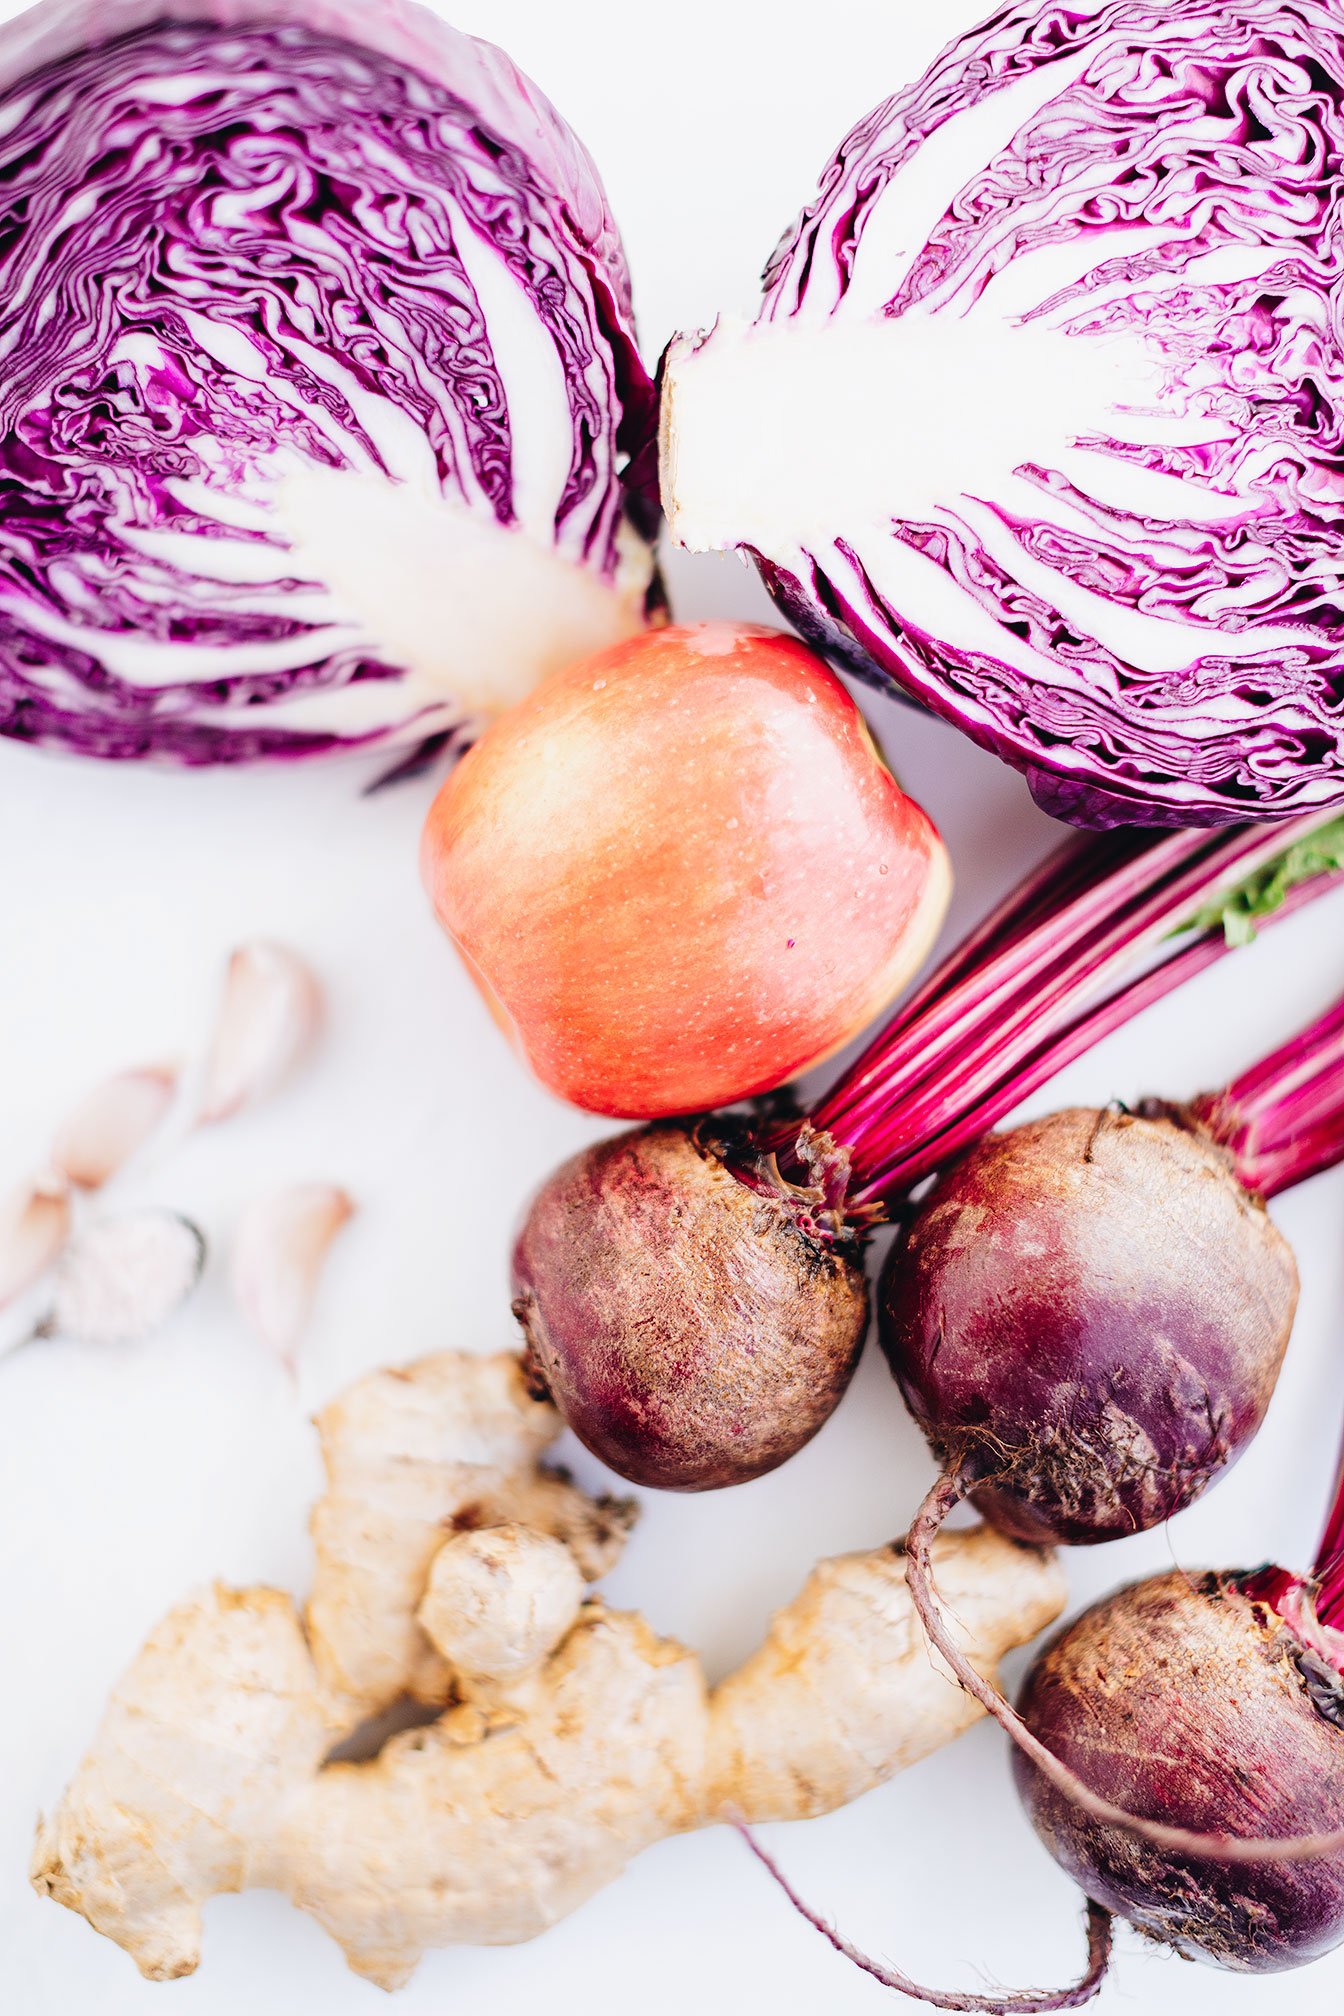
There are many sauerkraut flavor variations but for this recipe, we are using red beets, red cabbage, ginger and apple - inspired by my favorite store bought sauerkraut - Wildbrine red beet and cabbage sauerkraut.
A simple yet flavorful small batch beet and cabbage sauerkraut recipe that is packed with probiotics and beneficial bacteria.

Sauerkraut does not have to be a daunting task, people! It can actually be pretty fun! Requiring 10-20 minutes of prep time, then letting nature take its course.
There are many sauerkraut flavor variations but for this recipe, we are using red beets, red cabbage, ginger and apple - inspired by my favorite store bought sauerkraut - Wildbrine red beet and cabbage sauerkraut.
The sweet and tangy flavors seem to pair nicely with most dishes (i.e. eggs, sandwiches, tacos, wraps and if you are a part of the Nourishment program - nourish bowls!) as well as provide amazing texture to a dish!

Typically, when we talk about foods that are rich in probiotics, we’re referring to foods that have been bacterially fermented. They help introduce beneficial bacteria into our digestive tracts, help keep harmful bacteria at bay, provide helpful digestive enzymes, are nutrient dense, and are low cost - in fact, the ingredients cost $6 to make and it produced 30+ servings!
Gut Friendly Tip
When buying Kombucha, water kefir, or sauerkraut, look for “raw” or “unpasteurized” on the packaging. Pasteurization applies high heat to a food in order to kill bacteria (pathogenic contaminants and probiotics). While this process extends shelf life, it also kills all the wonderful microbes that make these foods uniquely beneficial!

If you try this recipe, let us know! Leave a comment, rate it, and don’t forget to tag a photo to #fromtherootsblog on Instagram. We love seeing what you come up with!
A simple yet flavorful small batch beet and cabbage sauerkraut recipe that is packed with probiotics and beneficial bacteria.
Prep Time: 20 minutes Yield: 30+ servings
Ingredients
1 small red cabbage (finely shredded or chopped)
2 medium raw beets (finely shredded or chopped)
1 inch ginger root (grated)
3 cloves garlic (optional) (grated)
1 medium red apple (honeycrisp) or pear (finely chopped)
2 tsp celtic sea salt
Directions
Prepare ingredients by finely chopped / mandolin sliced cabbage and raw beets.
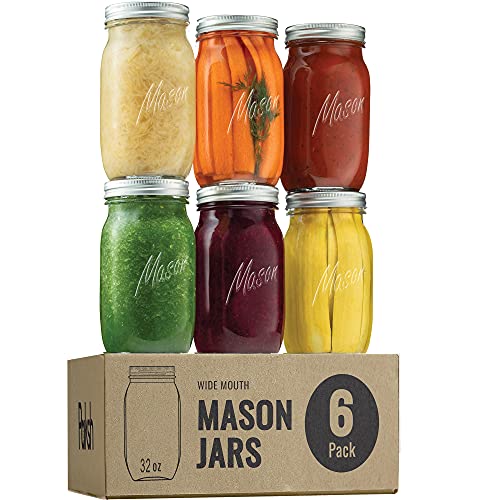
Sterilize any equipment that you will be using (i.e. mason jars) to allow for proper fermentation. You can do this by pouring boiling water over clean jars/lids and drying completely. Allow the temperature to come back to room temperature before adding ingredients.
To a large mixing bowl, add the finely shredded cabbage and top with salt. Wash hands thoroughly and massage cabbage for ten minutes. You will notice when to stop massaging the cabbage when it starts to soften, shrink in size, and release water.
Add shredded beet, ginger, garlic, and apple and massage once more with clean hands for an additional 5 minutes. Taste test and adjust flavor, grated ginger for more zing, salt for more saltiness, or garlic for more garlicky flavor.
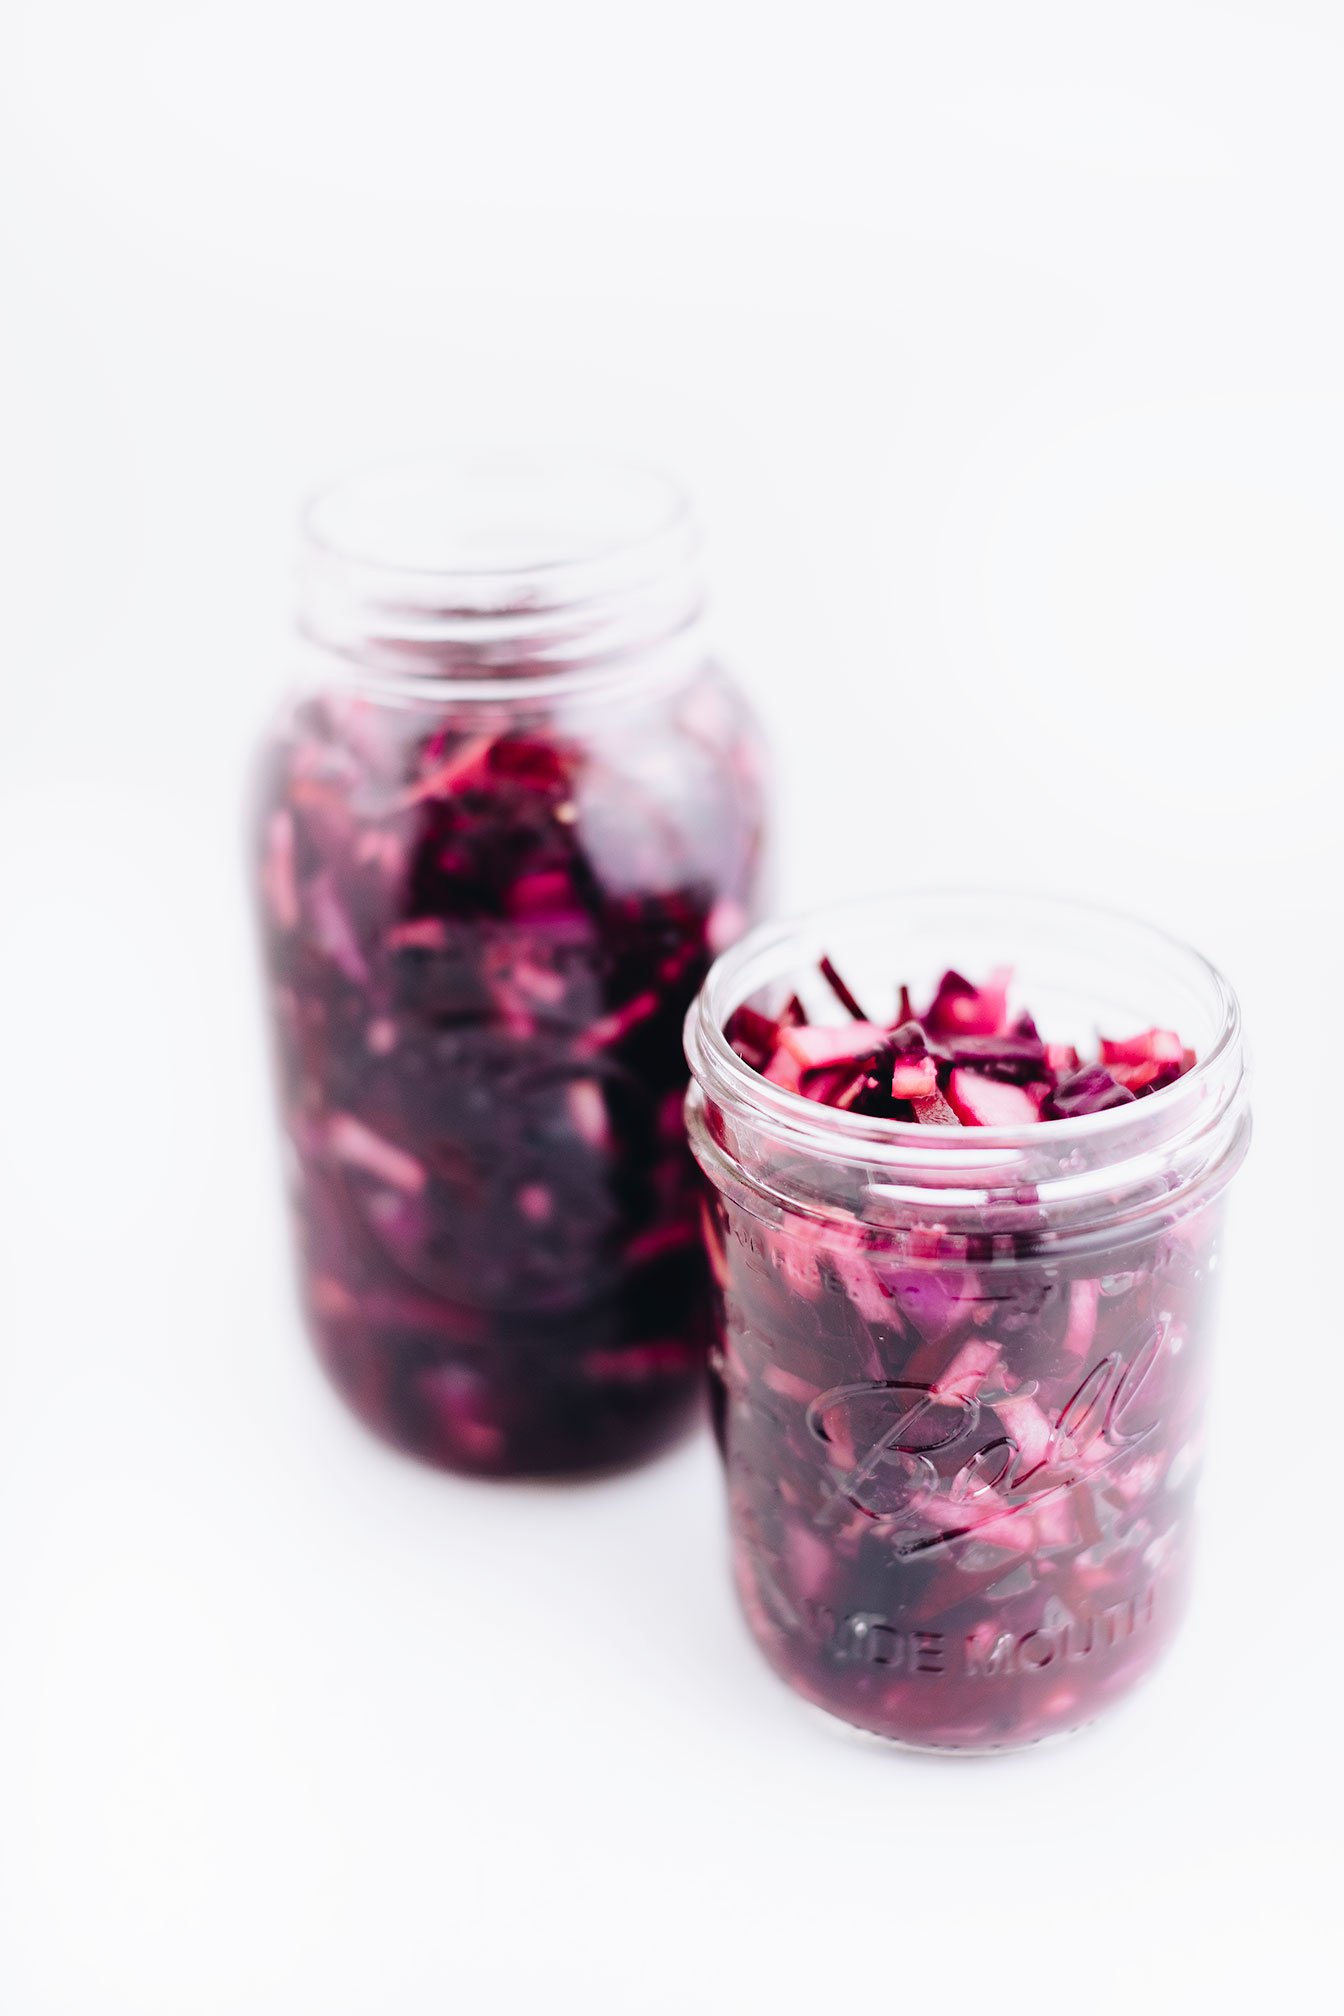
Place mixture and juice in sterilized mason jars and pack it down with a muddler or with the end of a wooden spoon.
If there is not enough liquid to cover, mix one tsp sea salt with 1 cup filtered water and fill until the mixture is submerged - leaving at least an inch of space at the top of the jar.
Cover the jar loosely with the lid and transfer on a pan or bowl (for catching any liquid during the fermentation process)
Place in a dark place (out of direct sunlight) (ideally 65 degrees F). Fermentation may take longer if room temperature is on the colder side.
Check for activity (tiny bubbles should rise to the top) after 3-4 days. The longer it sits and ferments (up to 2-3 weeks), the tangier it will become, so sample occasionally with a clean utensil. Once it has reached the desired tanginess, cover securely and transfer to the fridge when ready to eat.
Sauerkraut should be kept in the fridge for at least 3-6 months.
Notes
Liquid will naturally seep out during the first few days of fermentation as carbon dioxide - bubbles will be produced. That is why it’s best to sit your jars in a pan or bowl!
You need the natural bacteria from a whole cabbage so please do not use pre-shredded cabbage.
Any cabbage that is exposed to air will likely get moldy. Feel free to remove the mold if it is just on the top, you likely can salvage the rest. Always trust your sense of smell though. Fermented cabbage mixture should smell pleasantly sour. Never eat anything that smells yeasty or frankly repulsive.
SHOP OUR FAVORITE TOOLS + INGREDIENTS FOR THIS RECIPE!


Pumpkin Cornbread Muffins
Another cornbread recipe!? Yes ma’am! This time, we are just going straight into a muffin tin vs cast iron skillet. Why? Well...I tend to just eat straight out of the skillet in one sitting so individually portioned muffins are what I need in life. Haha
Muffins are fun, in general though! But now that I’m thinking about it, I believe I have more muffin recipes on the blog than anything else! Enough small talk, let’s just dive right into this recipe!
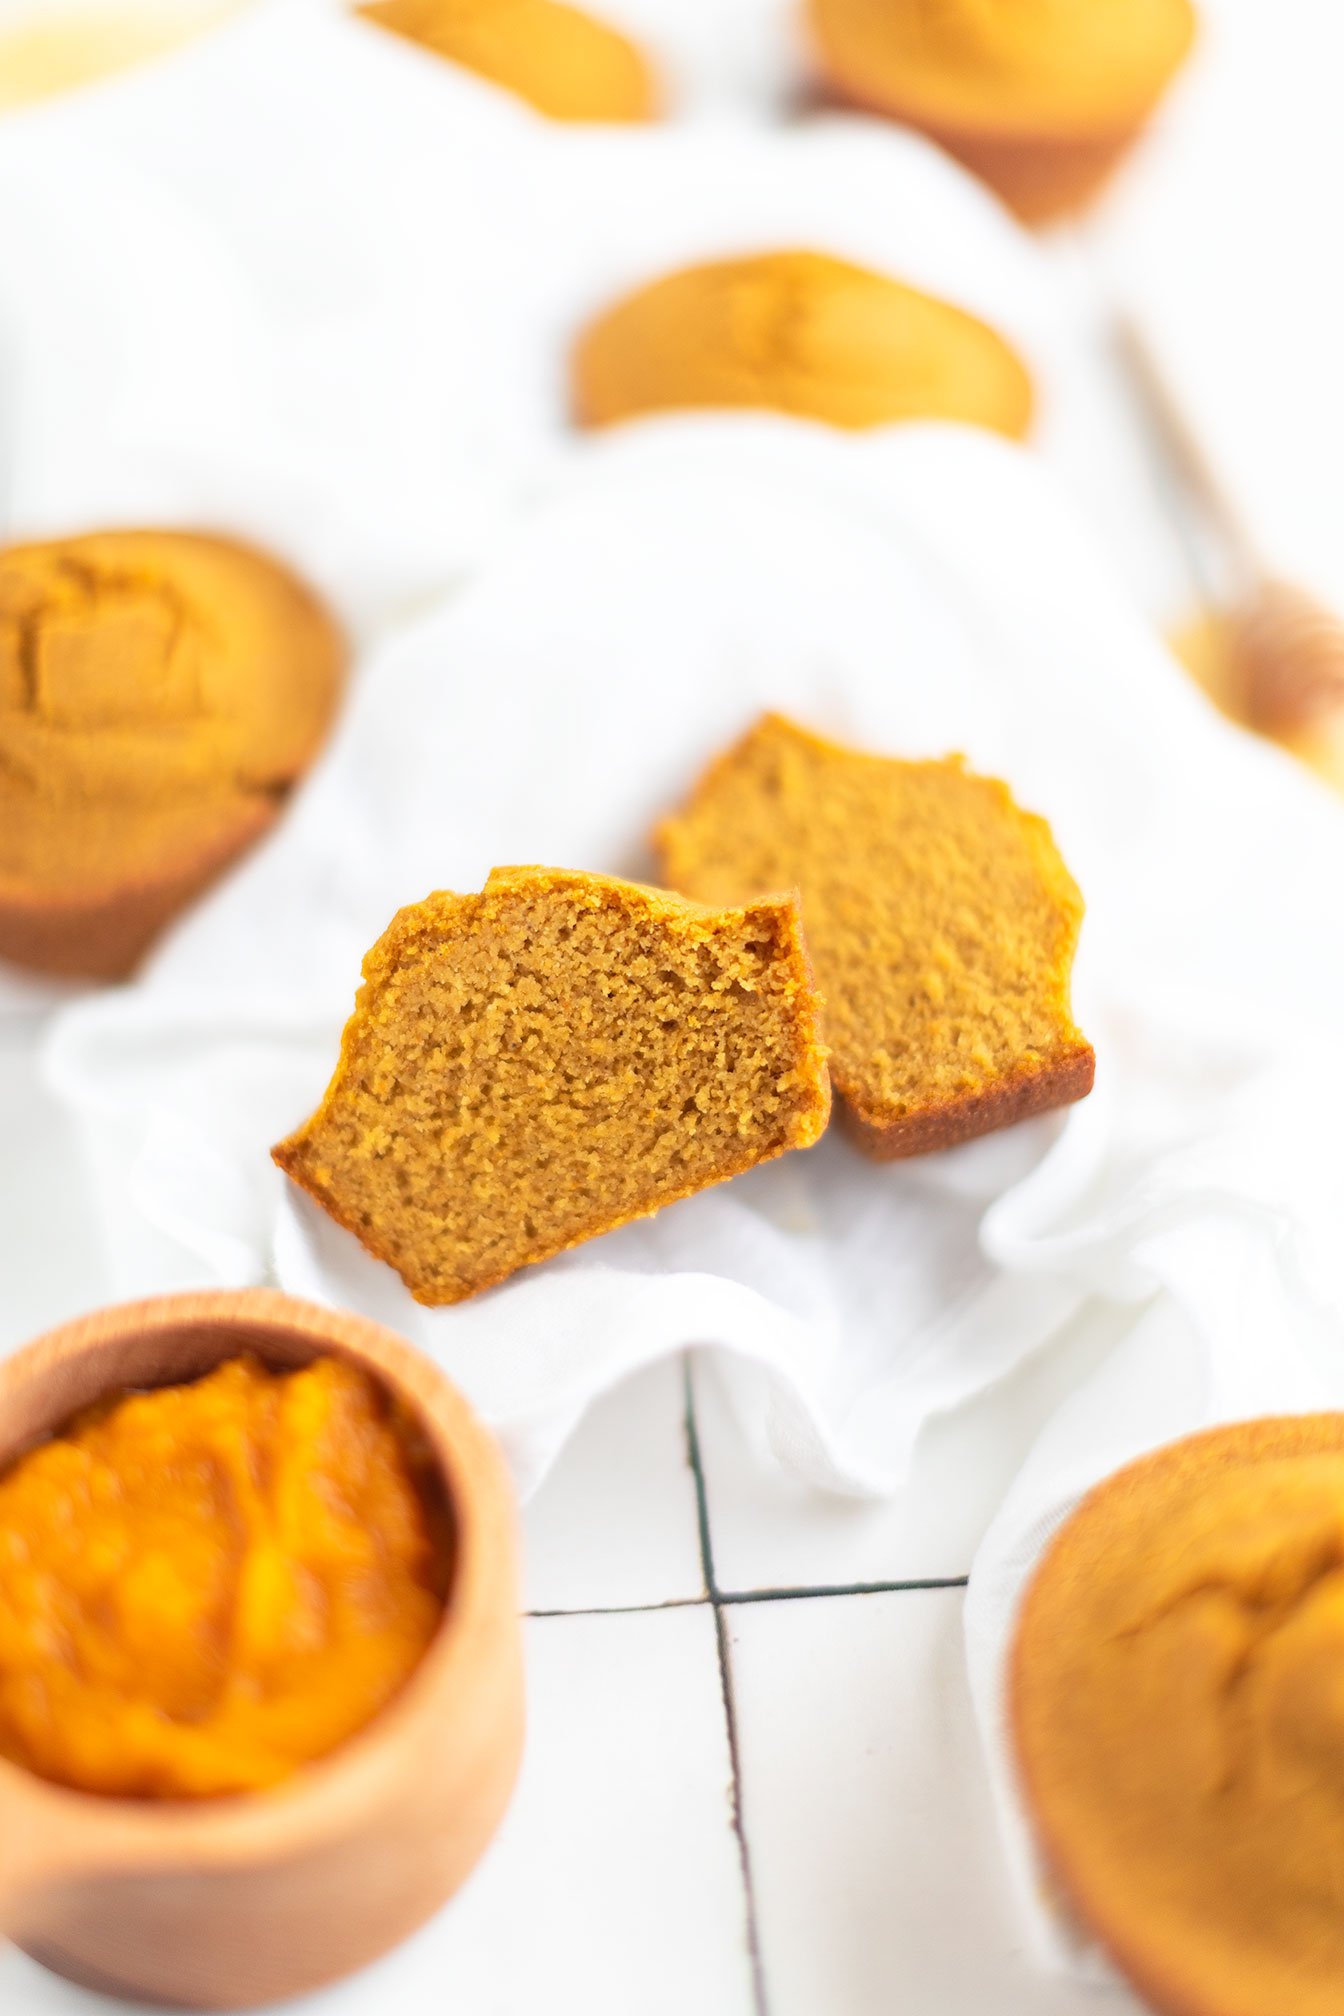
I do have to preface by saying that if you don’t like the taste of pumpkin or team no #psl, then please don’t leave! Haha I want to assure you that these pumpkin cornbread muffins actually don’t taste like pumpkin. If anything, they taste more like a jiffy style cornbread flavor. The sole reason pumpkin puree is used in this recipe is because of texture and nutrients!
Pumpkin Cornbread Muffins - The ultimate cozy accompaniment to soups, stews, chilis, and more! (gluten and dairy-free)

Another cornbread recipe!? Yes ma’am! This time, we are just going straight into a muffin tin vs cast iron skillet. Why? Well...I tend to just eat straight out of the skillet in one sitting so individually portioned muffins are what I need in life. Haha

Muffins are fun, in general though! But now that I’m thinking about it, I believe I have more muffin recipes on the blog than anything else! Enough small talk, let’s just dive right into this recipe!

I do have to preface by saying that if you don’t like the taste of pumpkin or team no #psl, then please don’t leave! Haha I want to assure you that these pumpkin cornbread muffins actually don’t taste like pumpkin. If anything, they taste more like a jiffy style cornbread flavor. The sole reason pumpkin puree is used in this recipe is because of texture and nutrients!

Though I love my gluten-free cornbread skillet recipe, and yes, these are gluten-free as well. This cornbread recipe just might have that one beat! The pumpkin puree adds a new level of fluffy texture while elevating the flavors! And yes, there is a small amount of pumpkin spice seasoning in the batter, but again, it just elevates the corn flavor in the cornbread which makes it completely neutral if that makes sense.


So feel free to eat these classic with a pad of grass-fed butter and honey, or accompany to comfort dishes like chicken zoodle soup, creamy tomato pesto soup, butternut squash, kale, and white bean lasagna soup, veggie beef stew, or mexican harvest turkey chili.

If you try this recipe, let us know! Leave a comment, pin it, and don’t forget to tag a photo to #fromtherootsblog on Instagram. We love seeing what you come up with!
Pumpkin Cornbread Muffins - The ultimate cozy accompaniment to soups, stews, chilis, and more! (gluten and dairy-free)
Prep Time: 10 min Cook Time: 20 min Serving Size: 12 standard muffins/ 6 large muffins
Ingredients
1 cup gluten-free cornmeal
¾ cup gluten-free 1-to-1 baking flour
¾ cup plant based milk (or your favorite)
½ cup pumpkin puree (not pie filling)
¼ cup coconut sugar
¼ cup avocado oil
2 eggs, room temperature and lightly beaten
1 tsp apple cider vinegar
1 ½ tsp baking powder
½ tsp baking soda
½ tsp pumpkin spice seasoning
¼ tsp pink himalayan sea salt
Directions
In a liquid measuring cup, measure out milk and add the 1 tsp apple cider vinegar or lemon juice. Mix until combined and set aside. This is how to create “buttermilk” the plant-based way!
Preheat the oven to 375 degrees.
In a large bowl, combine cornmeal, flour, sugar, baking powder, baking soda, spice seasoning and salt. Whisk to combine. Whisk in the rest of the wet ingredients (ie “buttermilk”, pumpkin, lightly beaten eggs, and oil). Stir until combined and no dry clumps remain.
Scoop batter into a standard 12-cup muffin tin or a large 6-cup muffin tin (spray or grease if not nonstick).
Bake for 15-20 minutes, or until cooked through (a toothpick inserted in the center of a muffin and it comes out clean) and slightly golden.
Allow to cool slightly, then serve warm with a pad of grassfed butter and/or honey.
Notes
Like a spicy kick in your cornbread muffins? Feel free to mince 1 jalapeno or green chilis and add to batter.
Shop our favorite tools + ingredients for this recipe!


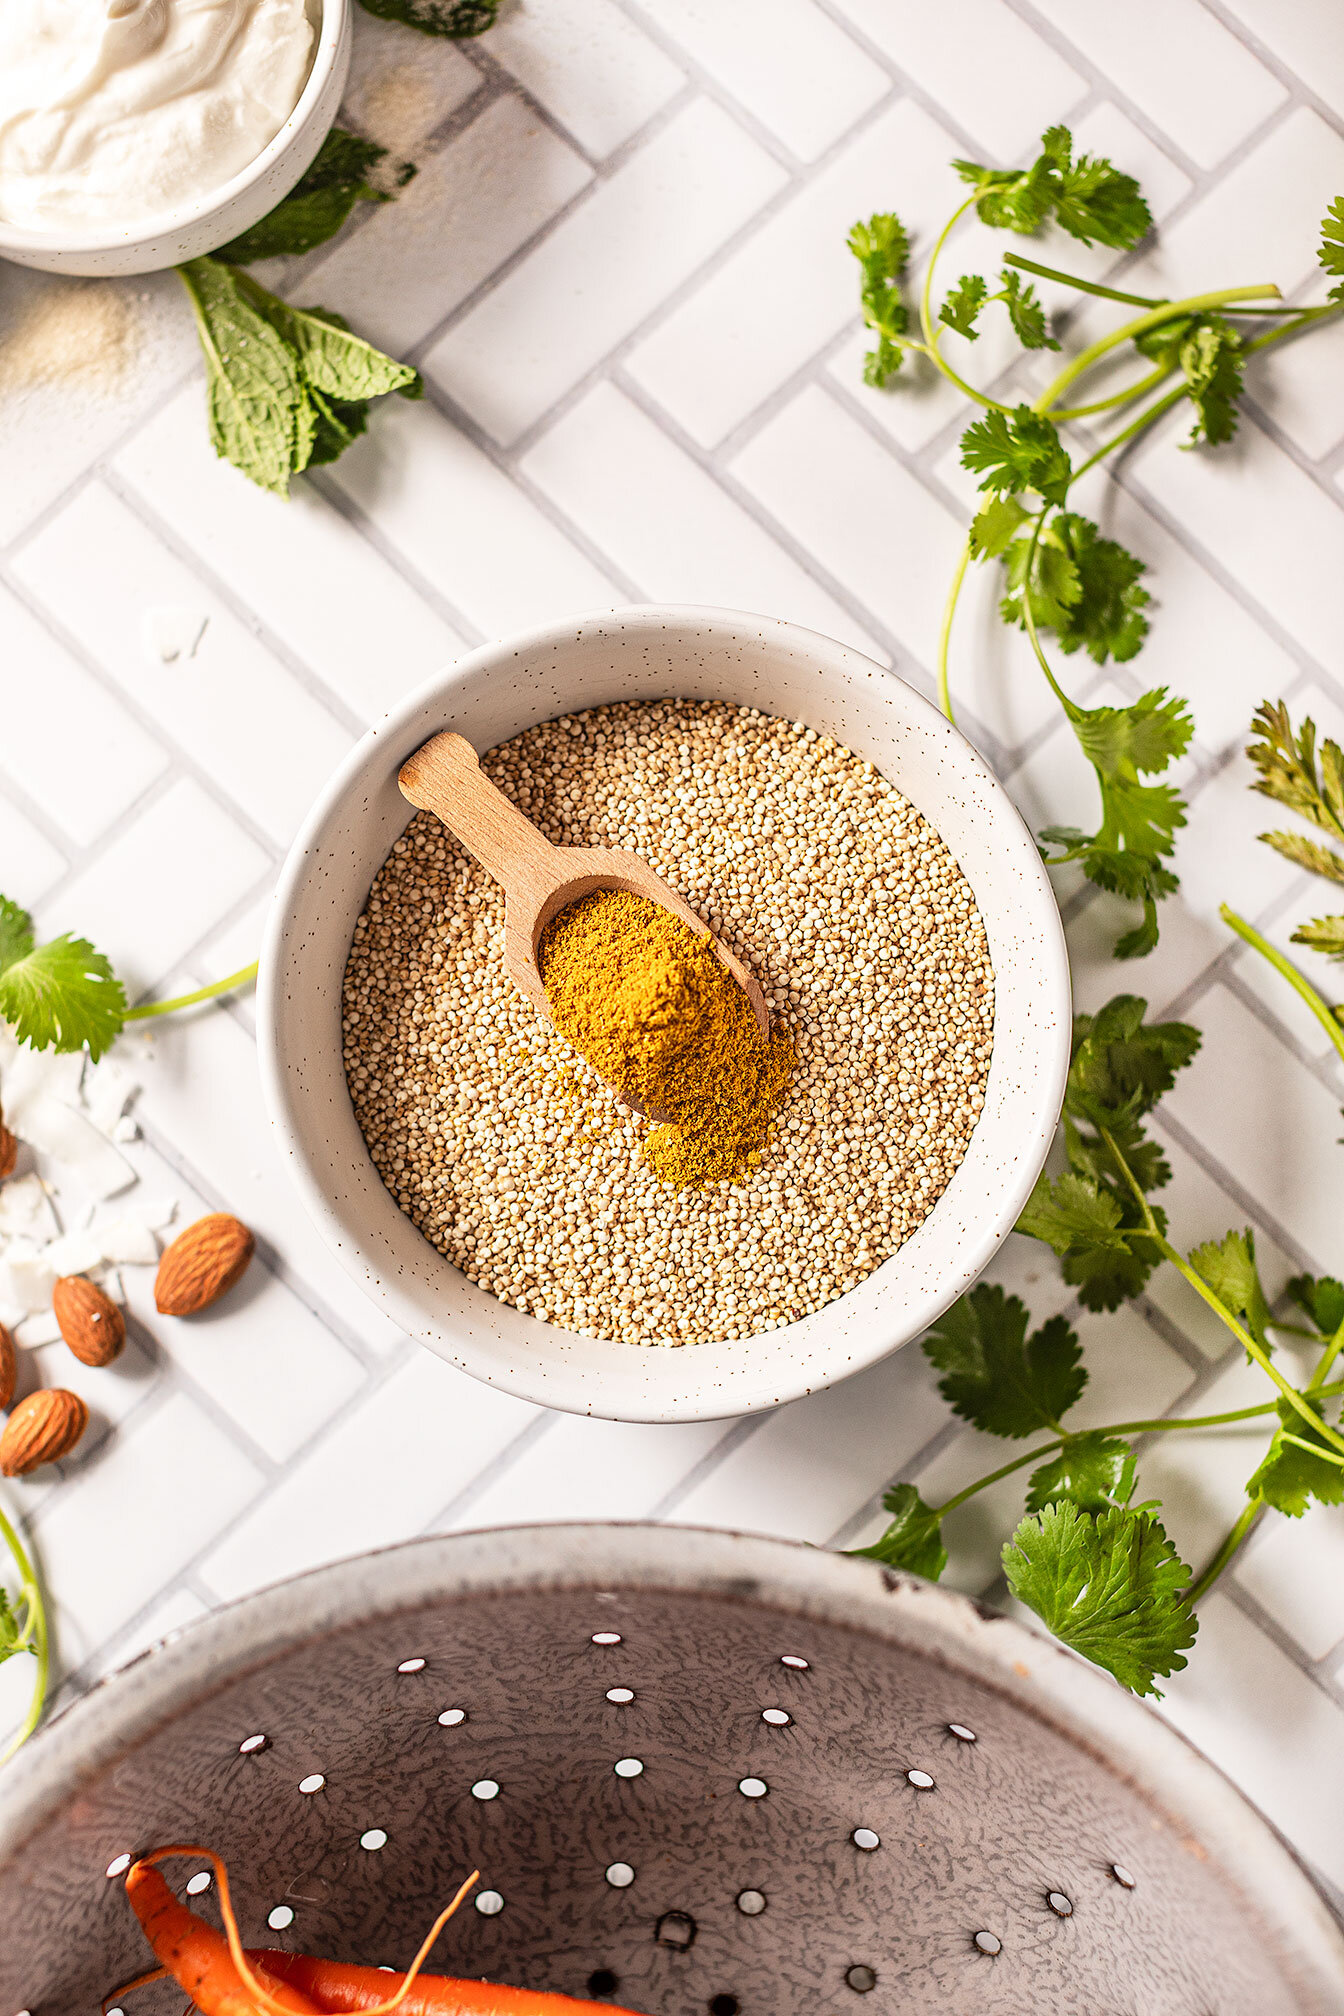
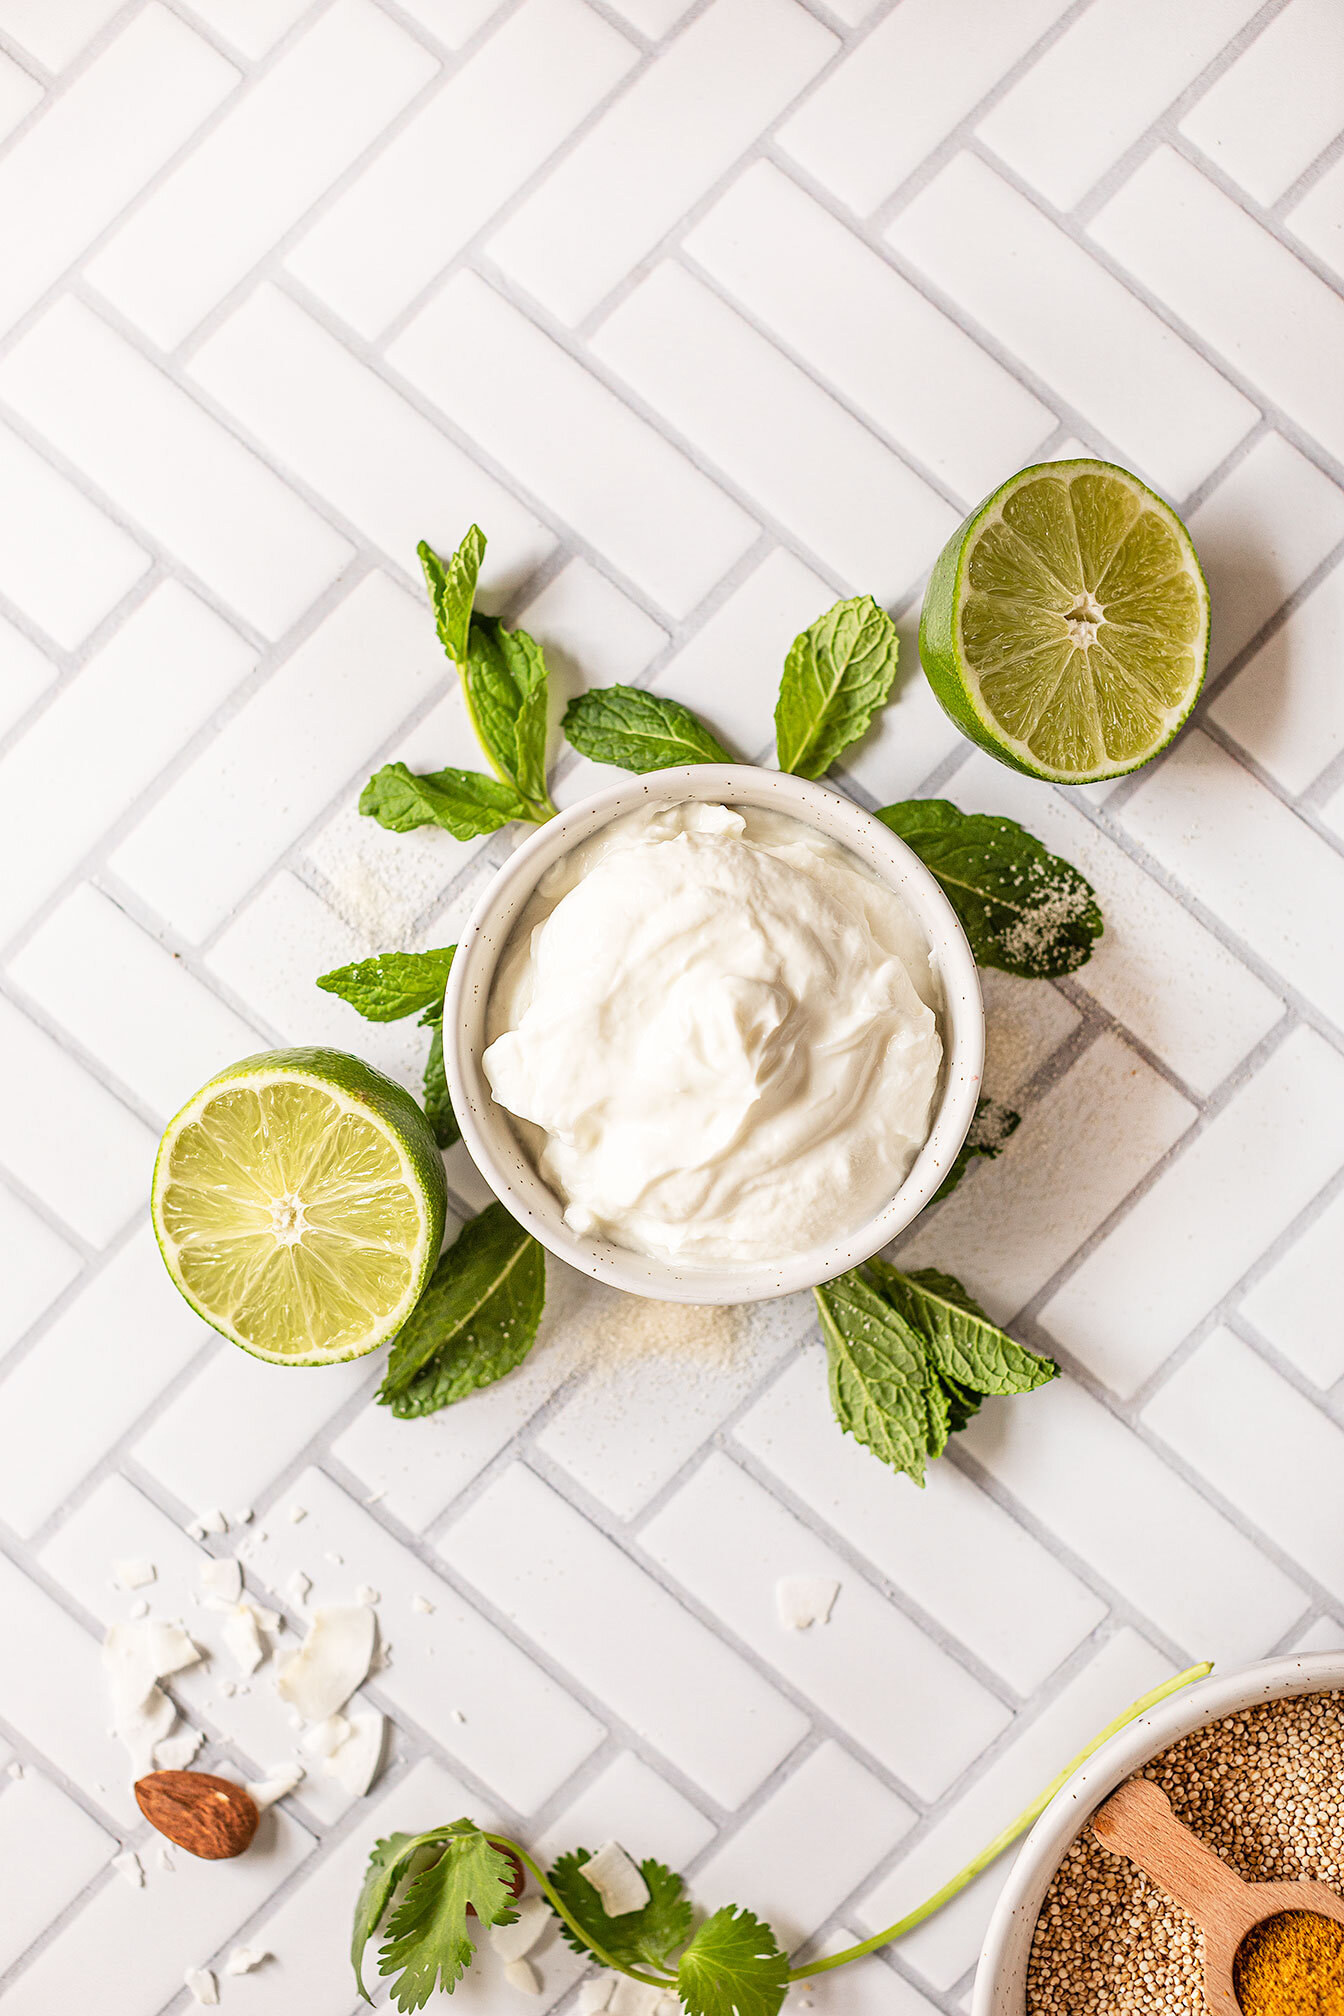
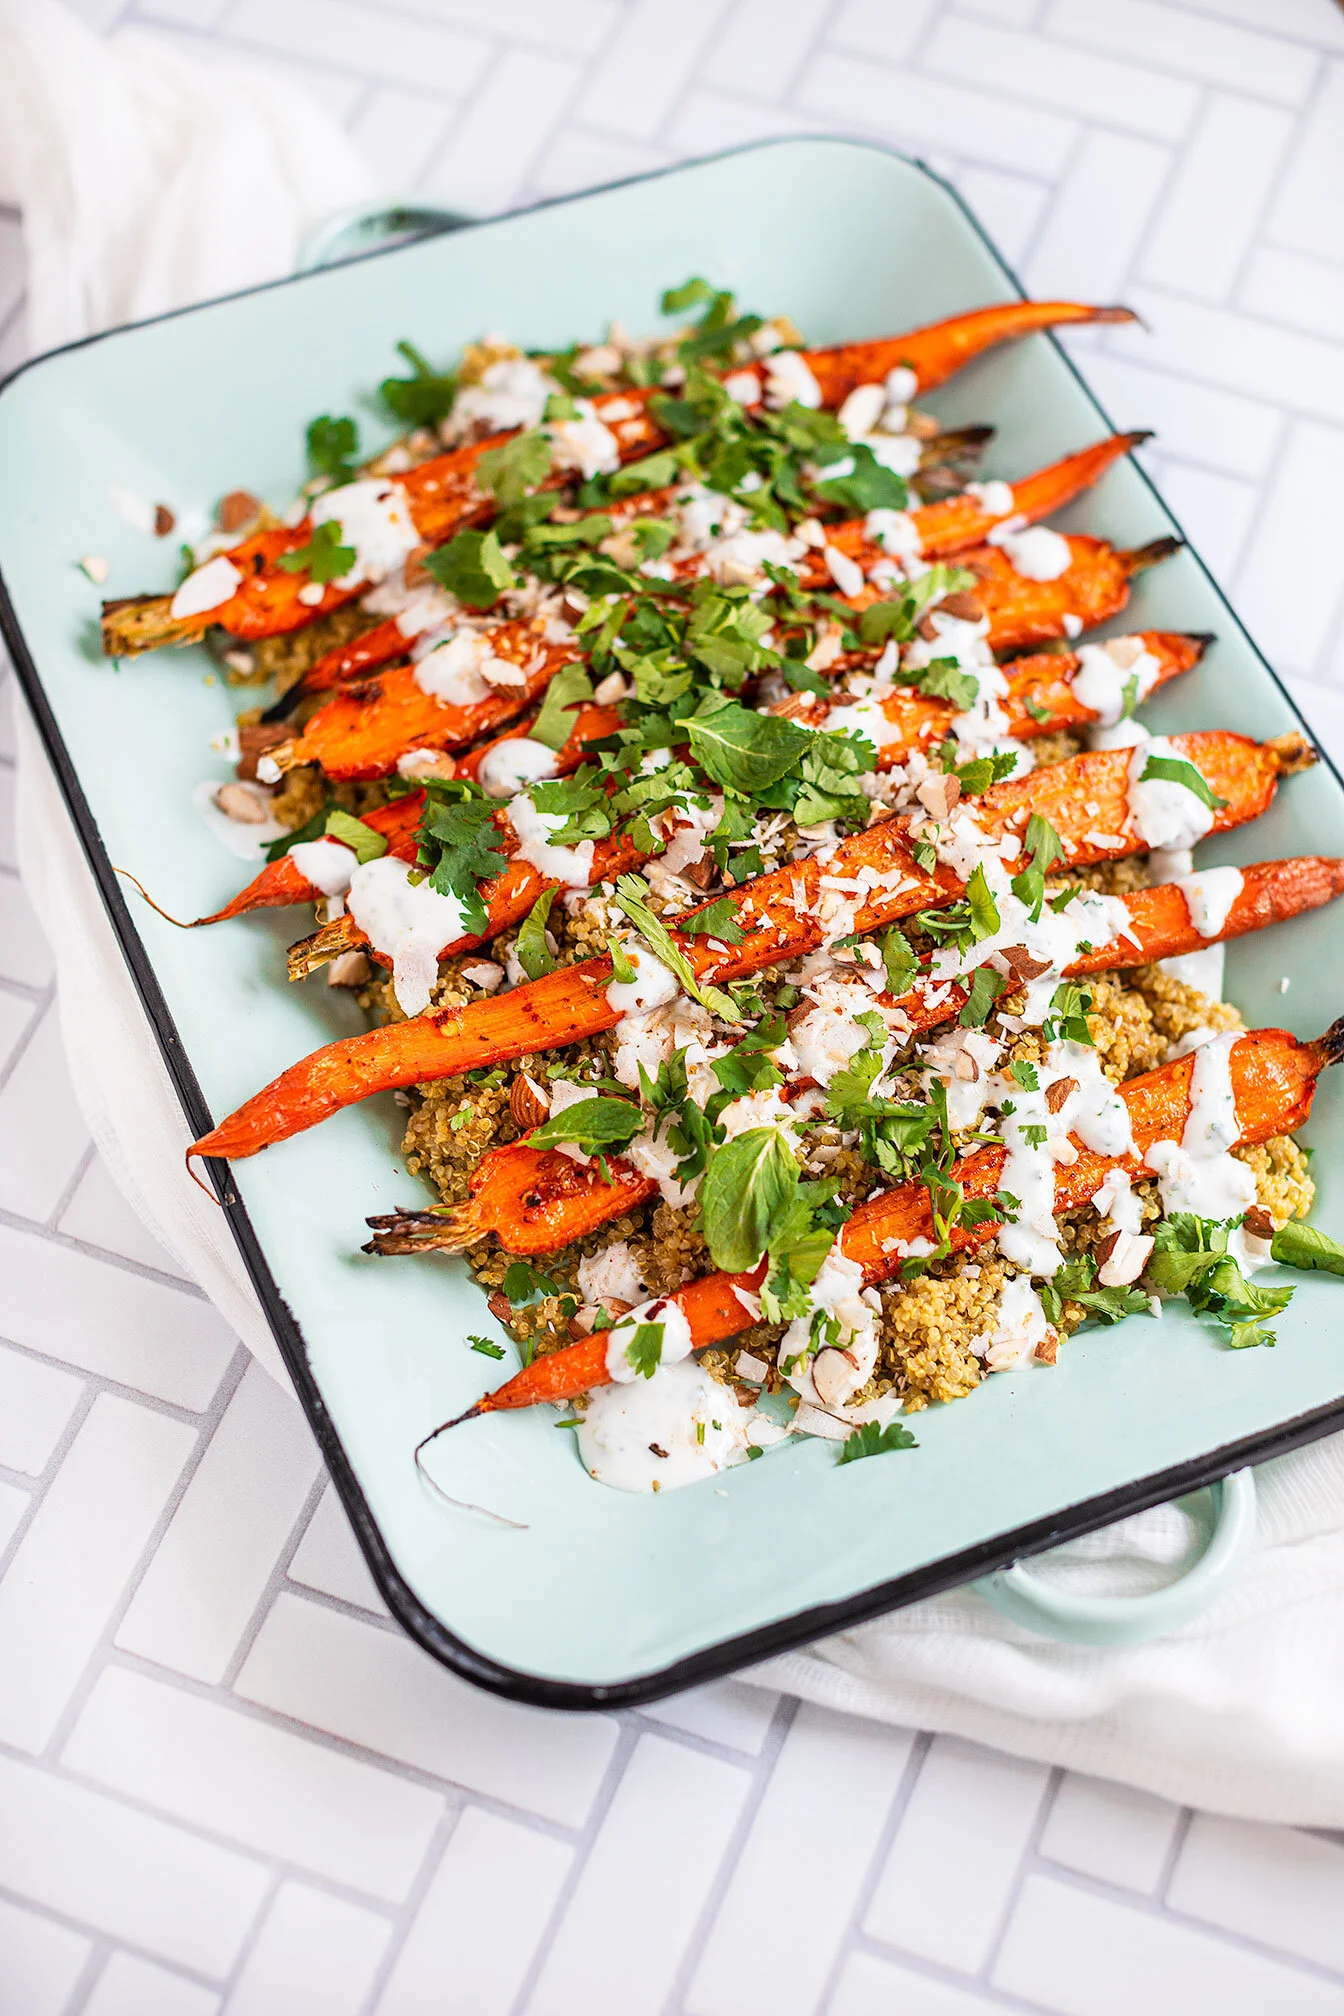
Curry Quinoa with Spicy Roasted Carrots and a Lime Mint Yogurt Sauce
Apparently, an Indian-inspired side dish is a perfect addition to an outdoor barbeque because the “barbeque” I went to, as well in fact an outdoor pizza party with hotdogs to cook on the fire. Haha, there was no theme but it did not matter because this side dish ended up being the theme of the night!
And just like the barbeque, there is no rhyme or reason to this recipe other than the fact that it tastes amazing! Who would have ever thought that a yogurt sauce that tastes like a coconut lime margarita could cut through the spicy roasted carrots and a flavor bomb of fluffy quinoa? Topped with the crunchy spicy granola-like mixture and you will find yourself going to flavor town! (I can’t believe I just said that!)
Curry Quinoa with Spicy Roasted Carrots and a Lime Mint Yogurt Sauce - The perfect Indian-inspired side dish that is fresh, flavorful, and family-friendly!


Apparently, an Indian-inspired side dish is a perfect addition to an outdoor barbeque because the “barbeque” I went to, as well in fact an outdoor pizza party with hotdogs to cook on the fire. Haha, there was no theme but it did not matter because this side dish ended up being the theme of the night!

And just like the barbeque, there is no rhyme or reason to this recipe other than the fact that it tastes amazing! Who would have ever thought that a yogurt sauce that tastes like a coconut lime margarita could cut through the spicy roasted carrots and a flavor bomb of fluffy quinoa? Topped with the crunchy spicy granola-like mixture and you will find yourself going to flavor town! (I can’t believe I just said that!)

If you try this recipe, let us know! Leave a comment, rate it, and don’t forget to tag a photo to #fromtherootsblog on Instagram. We love seeing what you come up with!
Curry Quinoa with Spicy Roasted Carrots and a Lime Mint Yogurt Sauce - The perfect Indian-inspired side dish that is fresh, flavorful, and family-friendly!
Ingredients
Curry Quinoa
1 cup quinoa
2 cups water
1 Tbsp grass-fed butter, coconut oil, or ghee
1 Tbsp hot madras curry powder (or regular curry powder)
1 tsp salt
Spicy Roasted Carrots
1 large bag of carrots (or tri-color carrots)
1 Tbsp salt-free spicy seasoning
1 Tbsp avocado oil
1 tsp salt
Lime Mint Yogurt Sauce
½ cup organic plain yogurt (lactose-free or dairy)
½ juice of lime + zest
½ tsp organic sugar
1-2 Tbsp fresh mint leaves
½ tsp salt
Topping blend
2 Tbsp coconut flakes
2 Tbsp chopped almonds
1 tsp no-salt spicy seasoning
¼ tsp salt
Garnish: cilantro and lime wedges
Directions
Add all ingredients (from curry quinoa) to a medium pot and prepare quinoa as instructed on the package.
**What I like to do to save time - add all ingredients (from curry quinoa) to a rice cooker and cook on the white rice setting.
Preheat the oven to 475 degrees. Peel and cut carrots longways. In a large mixing bowl, combine carrots, seasonings, and oil. Toss to combine. Line a large baking sheet with parchment paper and place carrots on the tray. Try not to overcrowd the carrots for even cooking! Cook for 20 min until cooked through and crispy. If you have thicker carrots, you may need to flip carrots over and cook for an additional 15-20 min.
To make the yogurt sauce, simply add all ingredients to a processor or nutri-bullet and blend until fully corporated. Taste test first before setting aside. You may need to add 1 Tbsp increments of water for desired sauce consistency.
In a small bowl, combine the topping blend until fully incorporated.
To assemble your side dish, layer the following components on a serving platter: Curry quinoa, spicy roasted carrots, yogurt sauce, chopped cilantro, and sprinkle topping blend! Enjoy!
Notes
Products used in this recipe: salt-free spicy seasoning, hot madras curry powder, curry powder, organic plain lactose-free yogurt

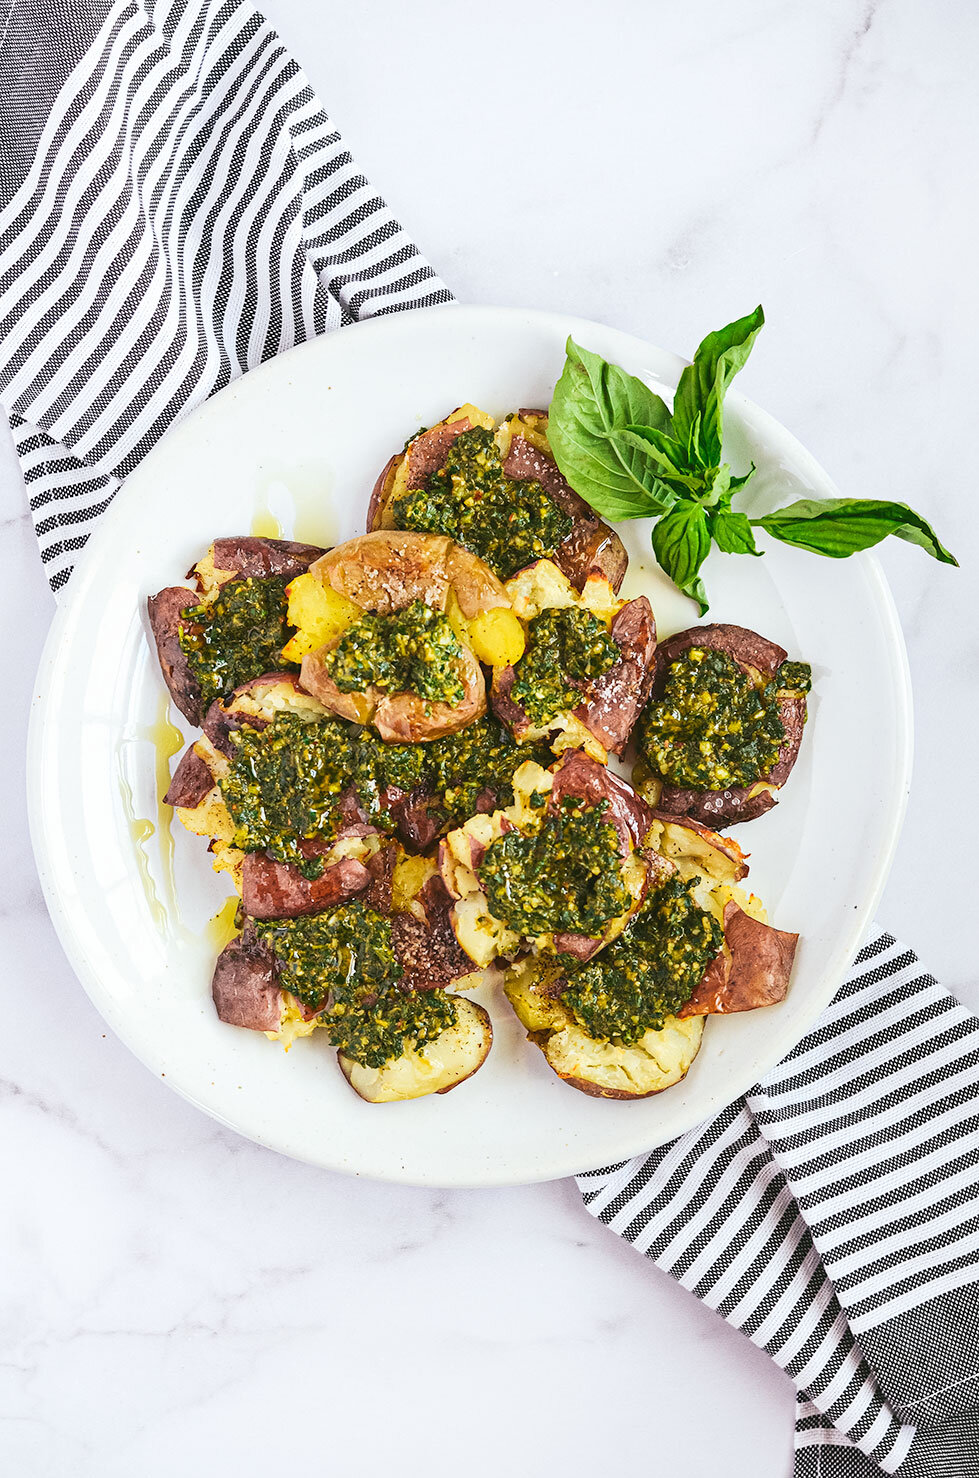
Crispy Smashed Potatoes with Garlic Pesto
Crispy Smashed Potatoes with Garlic Pesto - The perfect go-to side dish to make for dinner or as a carb source for your weekly lunch meal prep.
I have been making smashed potatoes for years! Why? Because they are just so simple to make!
Crispy Smashed Potatoes with Garlic Pesto - The perfect go-to side dish to make for dinner or as a carb source for your weekly lunch meal prep.


I have been making smashed potatoes for years! Why? Because they are just so simple to make!
Quick little breakdown on how to prepare these bad boys:
Boil the potatoes until they are fork-tender.
Make a creamy garlicky pesto that takes less than 5 minutes to make.
Smash those bad boys with a glass cup, palm of your hand, or a saucepan.
Drizzle with oil and roast until golden brown and crispy.
Spoon that delicious sauce over the potatoes and serve!

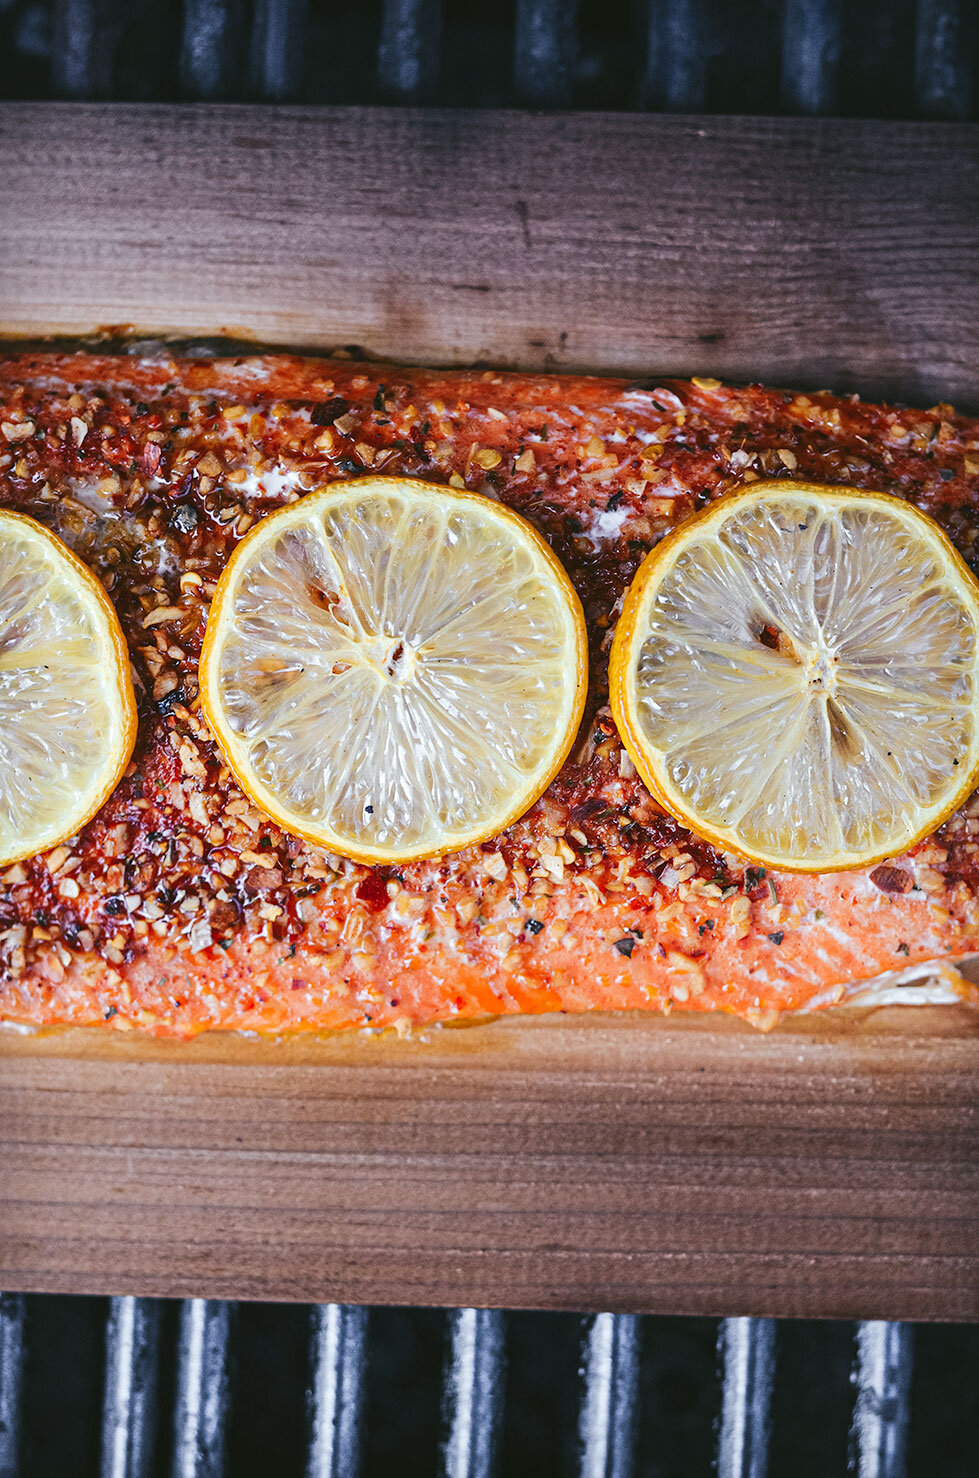
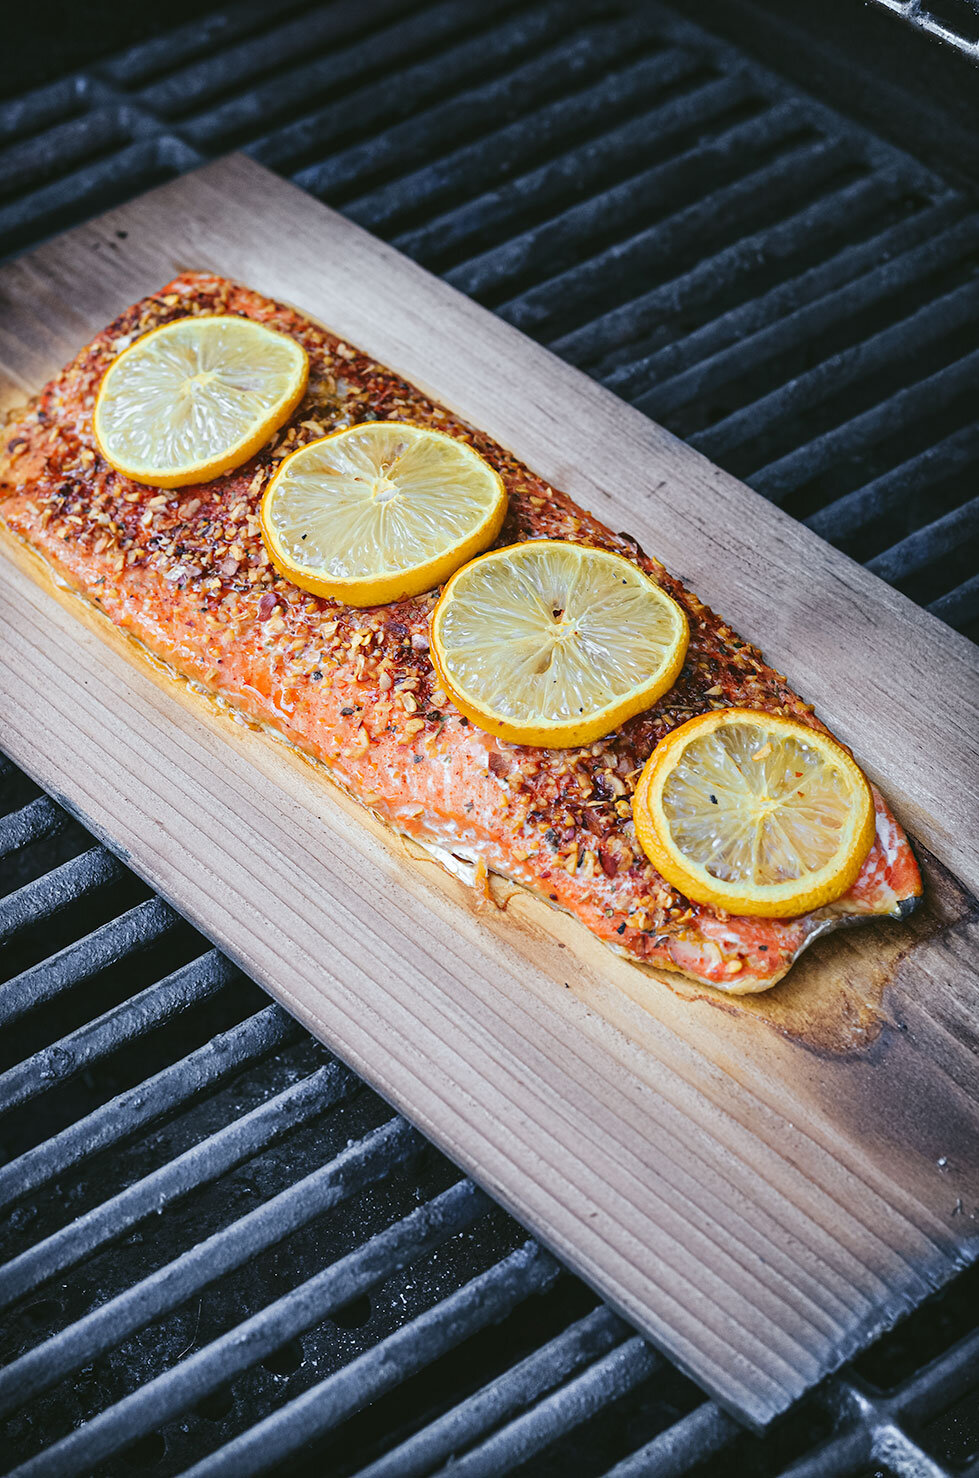
Lately, I have been digging planked salmon so for dinner this week, I paired smashed potatoes with planked salmon and a paleo caesar salad using Primal Kitchen Caesar Dressing and added fun uncured bacon bits from Epic. This would also pair well with baked hot chicken, pecan crusted spiced salmon and turkey meatballs.


If you try this recipe, let us know! Leave a comment, rate it, and don’t forget to tag a photo to #fromtherootsblog on Instagram. We love seeing what you come up with!
Crispy Smashed Potatoes with Garlic Pesto - The perfect go-to side dish to make for dinner or as a carb source for your weekly lunch meal prep.
Ingredients
Smashed Potatoes
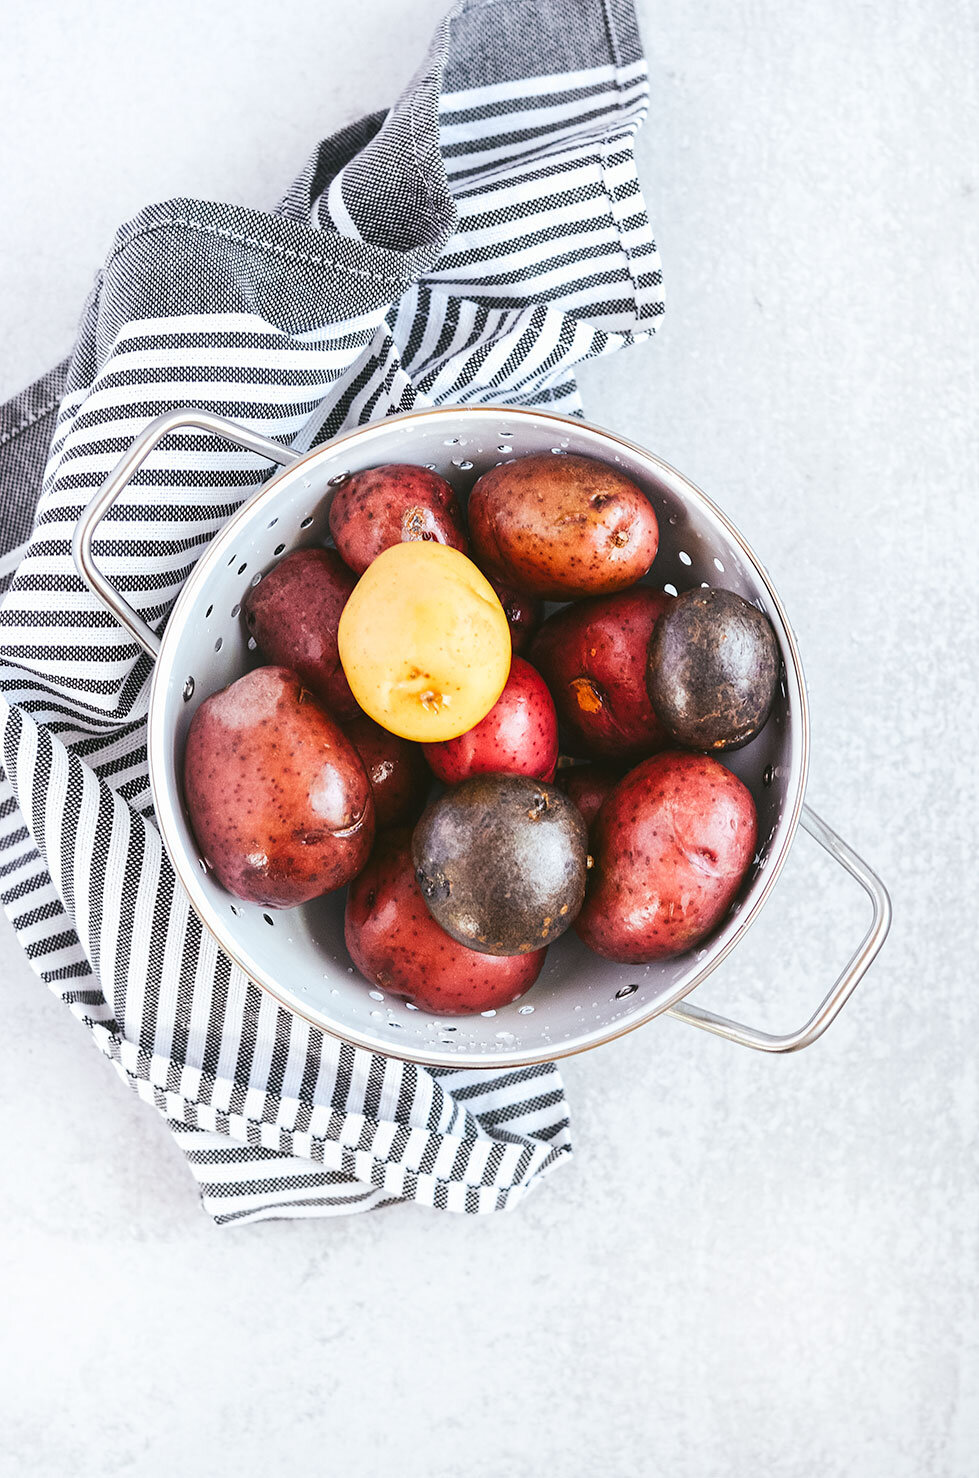
1 lb (16 oz) baby potatoes
1-2 Tbsp olive or avocado oil
Sea salt & black pepper
Garlic Pesto
2 cups packed fresh organic basil
¼ cup nutritional yeast
5-8 raw almonds
3 large cloves garlic (peeled)
⅓ cup olive or avocado oil (oil-free version - water or veggie stock)
Healthy pinch each sea salt and black pepper
Directions
Add rinsed potatoes to a large pot with water until potatoes are fully submerged. Bring water to a boil over medium-high heat and cook for 15-20 minutes. A knife should be able to slide in and out easily.
Preheat the oven to 450 degrees. Line a baking sheet with aluminum foil or parchment paper.
While the potatoes are cooking, prepare the pesto mixture by adding almonds and garlic to a food processor and pulse until finely chopped. Add basil, nutritional yeast, salt and pepper and turn the setting on low. As the processor is on low, pour the oil through the feed tube gradually. Scrape down the sides and add more if necessary to achieve the desired sauce consistency. (Oil-free version* add water or veggie stock gradually until desired consistency)
Taste and adjust taste if necessary, adding more nutritional yeast for that cheesy flavor, salt for overall flavor, garlic for that “bite” or almonds for a nuttier flavor. Transfer to a small serving dish and set aside.
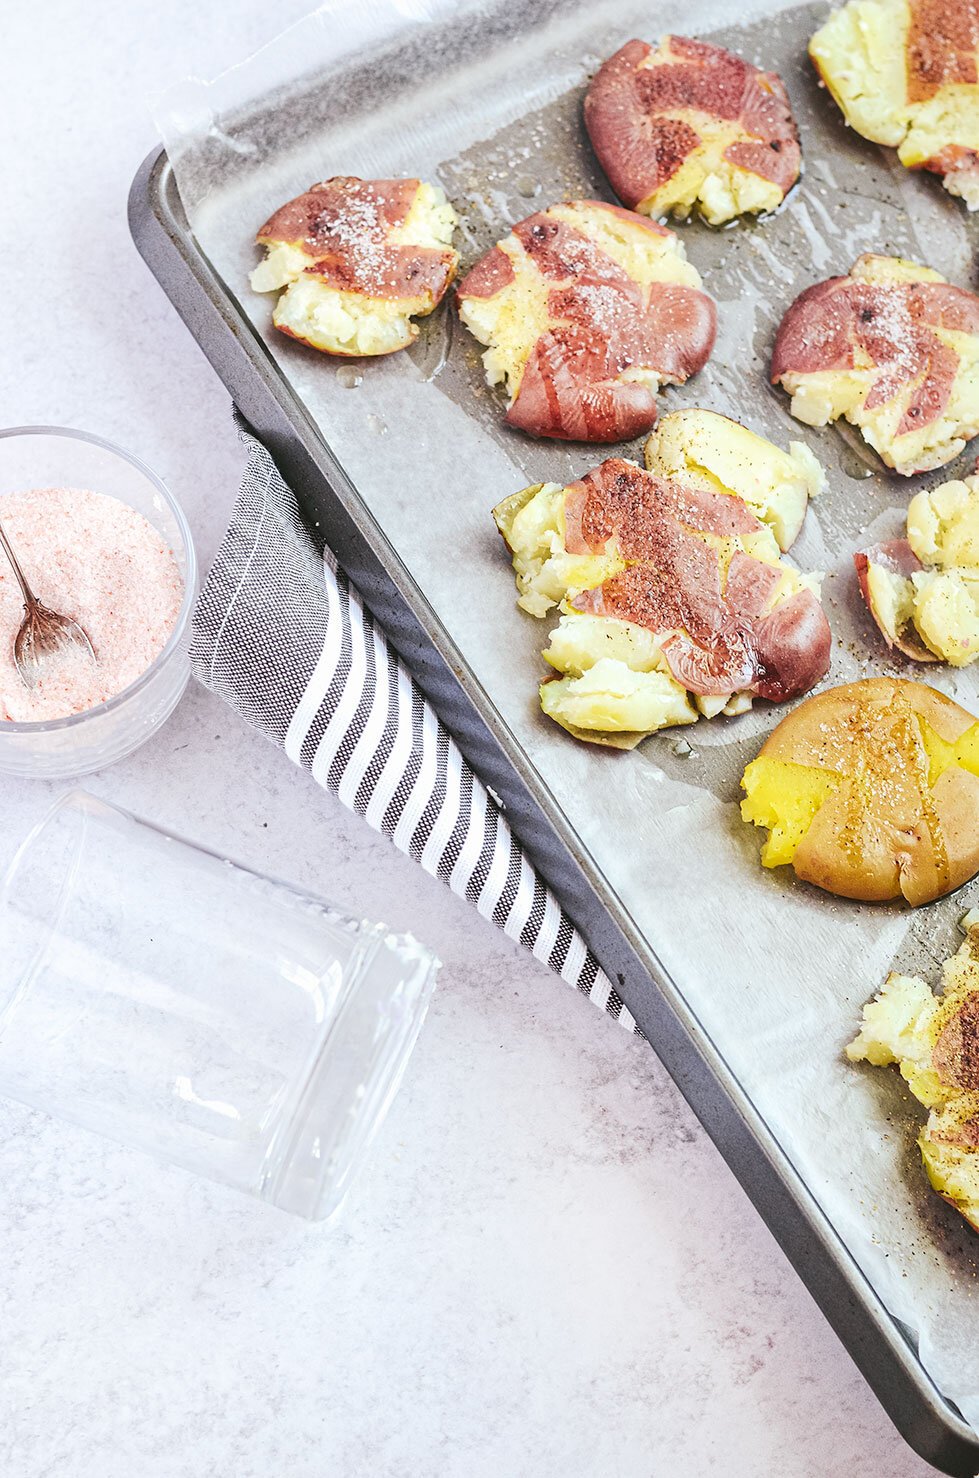
When the potatoes are soft and tender, place on the baking sheet and smash them down with the bottom of a saucepan, glass cup, or the palm of your hand. For any larger potatoes, cut in half and then smash.
Drizzle smashed potatoes with oil and generously season with salt and pepper. Roast for 20-25 minutes or until golden brown and crispy.
Spoon the pesto mixture over the potatoes and garnish with additional oil, salt and pepper if desired.

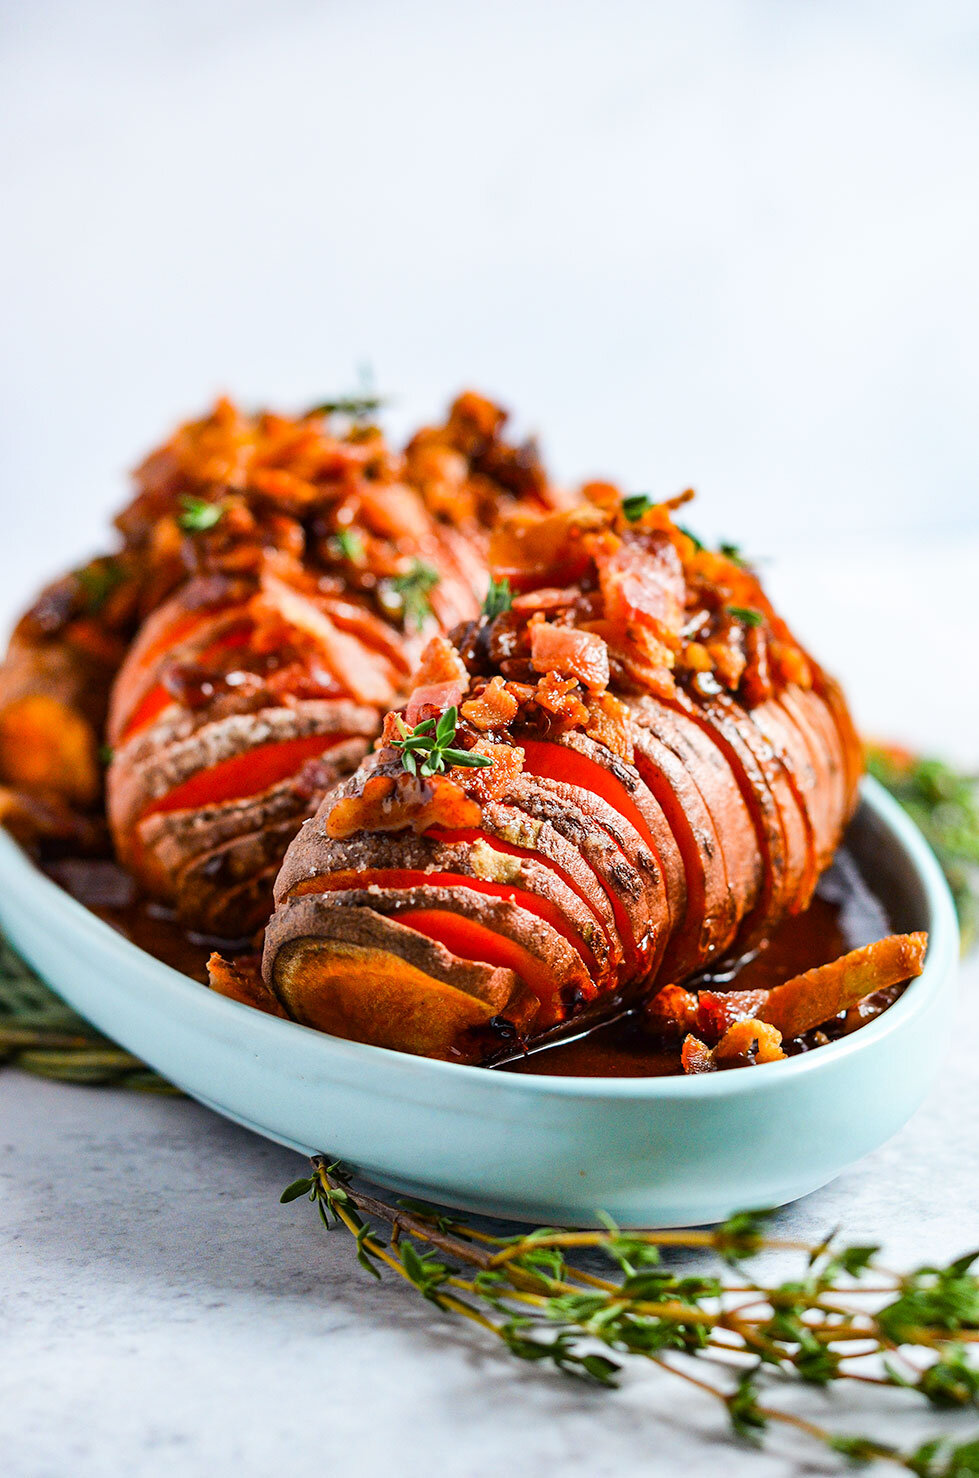
Paleo Hasselback Sweet Potatoes
As someone who doesn’t eat gluten, sweet potatoes are one of my favorite carbohydrate sources. They are great after a hard workout when you need to replenish glycogen stores and nutritionally, are among the best sources of vitamin A along with riboflavin, thiamin, and carotenoids due to their naturally orange color.
Hasselback Sweet Potatoes - Melt in your mouth, sop of buttery sweetness; you can’t tell it’s actually healthy for you! Paleo, dairy-free and gluten-free.
As someone who doesn’t eat gluten, sweet potatoes are one of my favorite carbohydrate sources. They are great after a hard workout when you need to replenish glycogen stores and nutritionally, are among the best sources of vitamin A along with riboflavin, thiamin, and carotenoids due to their naturally orange color.

Sweet potatoes nutrition versatility mirrors its versatility in our diet. They can be eaten any time during the day - paired well with most dishes from a poached egg for breakfast to adding coconut butter and cacao powder for dessert.
For this dish, it’s great for the holidays, as a side dish for dinner or implemented into lunch meal prep rotations!

As a tip, for the best Hasselback sweet potatoes, you’ll need to make deep incisions using a very sharp chef’s knife. Another thing I found was that if you place chopsticks on each side of the sweet potato and cut, it will make the best cut without going all the way through!

I would like to thank Bako Sweet for gifting me with these amazing organic California grown sweet potatoes! For more information regarding nutrition, products, and sourcing, check this link!


Now without further ado, let’s get to the recipe!


If you try this recipe, let us know! Leave a comment, rate it, and don’t forget to tag a photo to #fromtherootsblog on Instagram. We love seeing what you come up with!
Hasselback Sweet Potatoes - Melt in your mouth, sop of buttery sweetness; you can’t tell it’s actually healthy for you! Paleo, dairy-free and gluten-free.
Ingredients
4 Sweet potatoes
4 slices bacon (cooked and crumbled)
¼ cup raw pecans
2 Tbsp pure maple syrup
1 Tbsp coconut sugar
1 Tbsp grass-fed butter
1 tsp ground cinnamon
Avocado oil cooking spray
Pink Himalayan sea salt
Directions
Preheat the oven to 450 degrees. Line a sheet pan with foil, then coat the foil with cooking spray or simply use a silicone non-stick baking liner.
Place a potato on a cutting board between two chopsticks or two wooden spoons. Using a sharp chef’s knife, slice the potato into ¼ inch thick slices. (The chopsticks will prevent you from slicing all the way through the potato)
Repeat the process with the remaining potatoes. Plate the potatoes on the sheet pan. Spray potatoes with avocado oil spray and sprinkle sea salt.
Bake for 50-60 minutes until potatoes are tender, browned and tops are crispy.
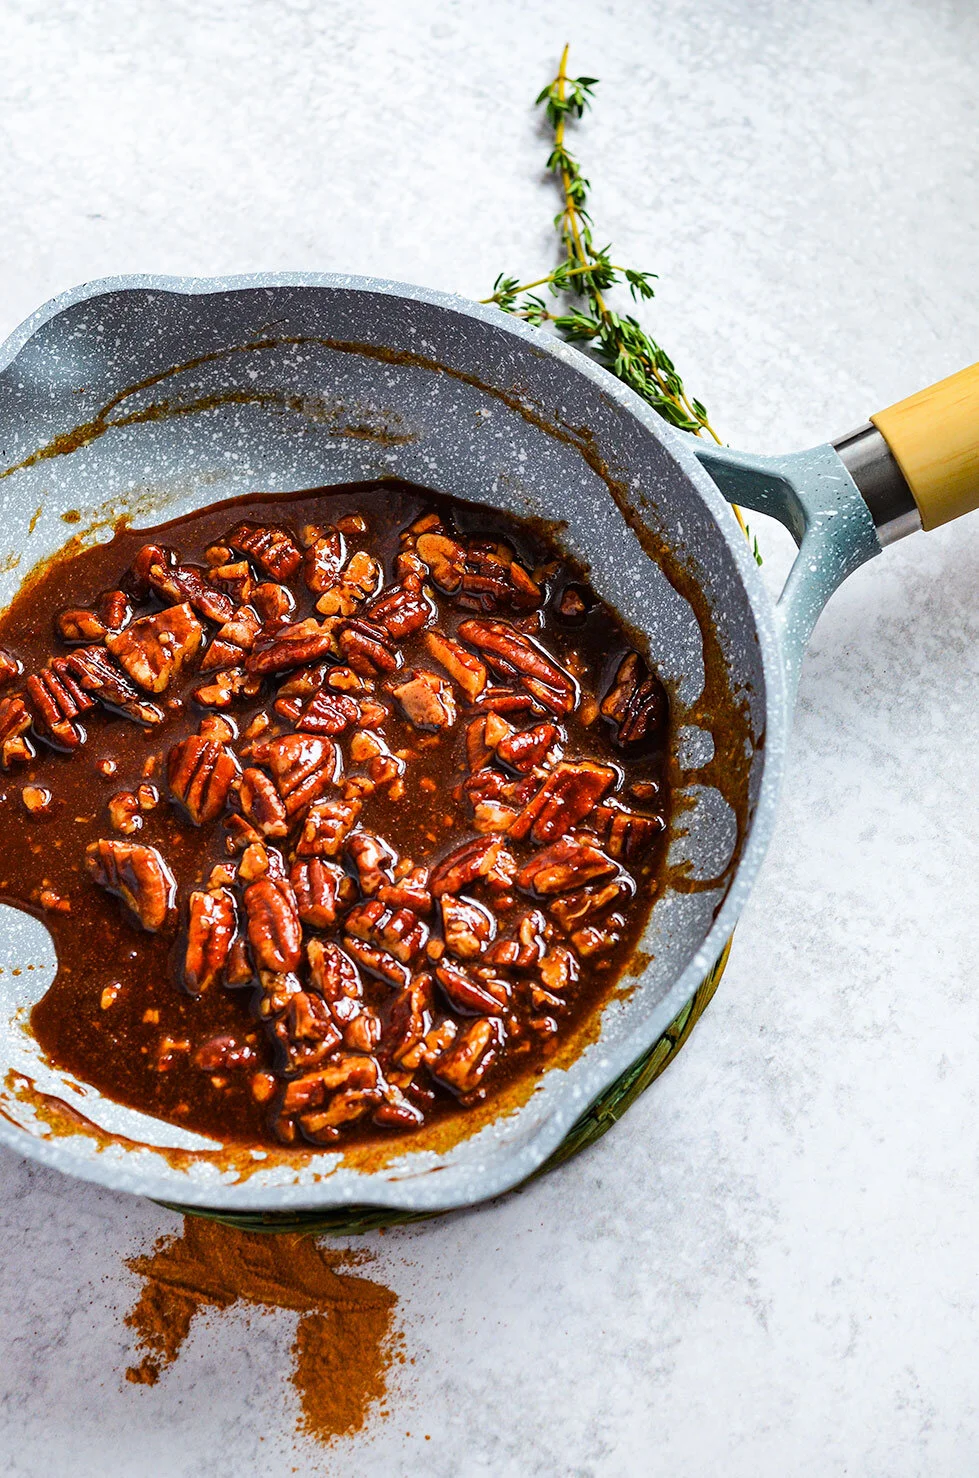
While the potatoes are cooking, melt butter in a small skillet on medium heat. Chop the pecans and add to the melted butter.
Stir for about 2-5 minutes until you get a nutty aroma. Add coconut sugar and maple syrup and stir.
As soon as the mixture starts to bubble, immediately add cinnamon to the mixture and take off the burner. Mix thoroughly until the mixture is thick but liquidy. May need to add tbsp water if the mixture is too thick. *Make sure the sugar doesn’t burn! This process is very fast.
Remove the potatoes from the oven and top each potato with pecan sugar mixture. Sprinkle the bacon and fresh thyme leaves over the top and enjoy!
Notes
Ingredients that I used that are #paleoapproved
Pederson’s Organic No Sugar Added Uncured Smoked Bacon
Primal Kitchen Avocado Oil Spray
Kerrygold Grass-fed Butter